Welcome!

My name, Karin, was pretty common when I was growing up...just not the spelling. Unless you are of German heritage like I am. So, I have spent my entire life answering the question, "What is your name"?... With, "Karin...with an "i"! Who knew it would come in handy all these years later when I went to name my blog.
Showing posts with label Thank you. Show all posts

Tuesday, January 2, 2024

Thank you


 Hi Everyone,

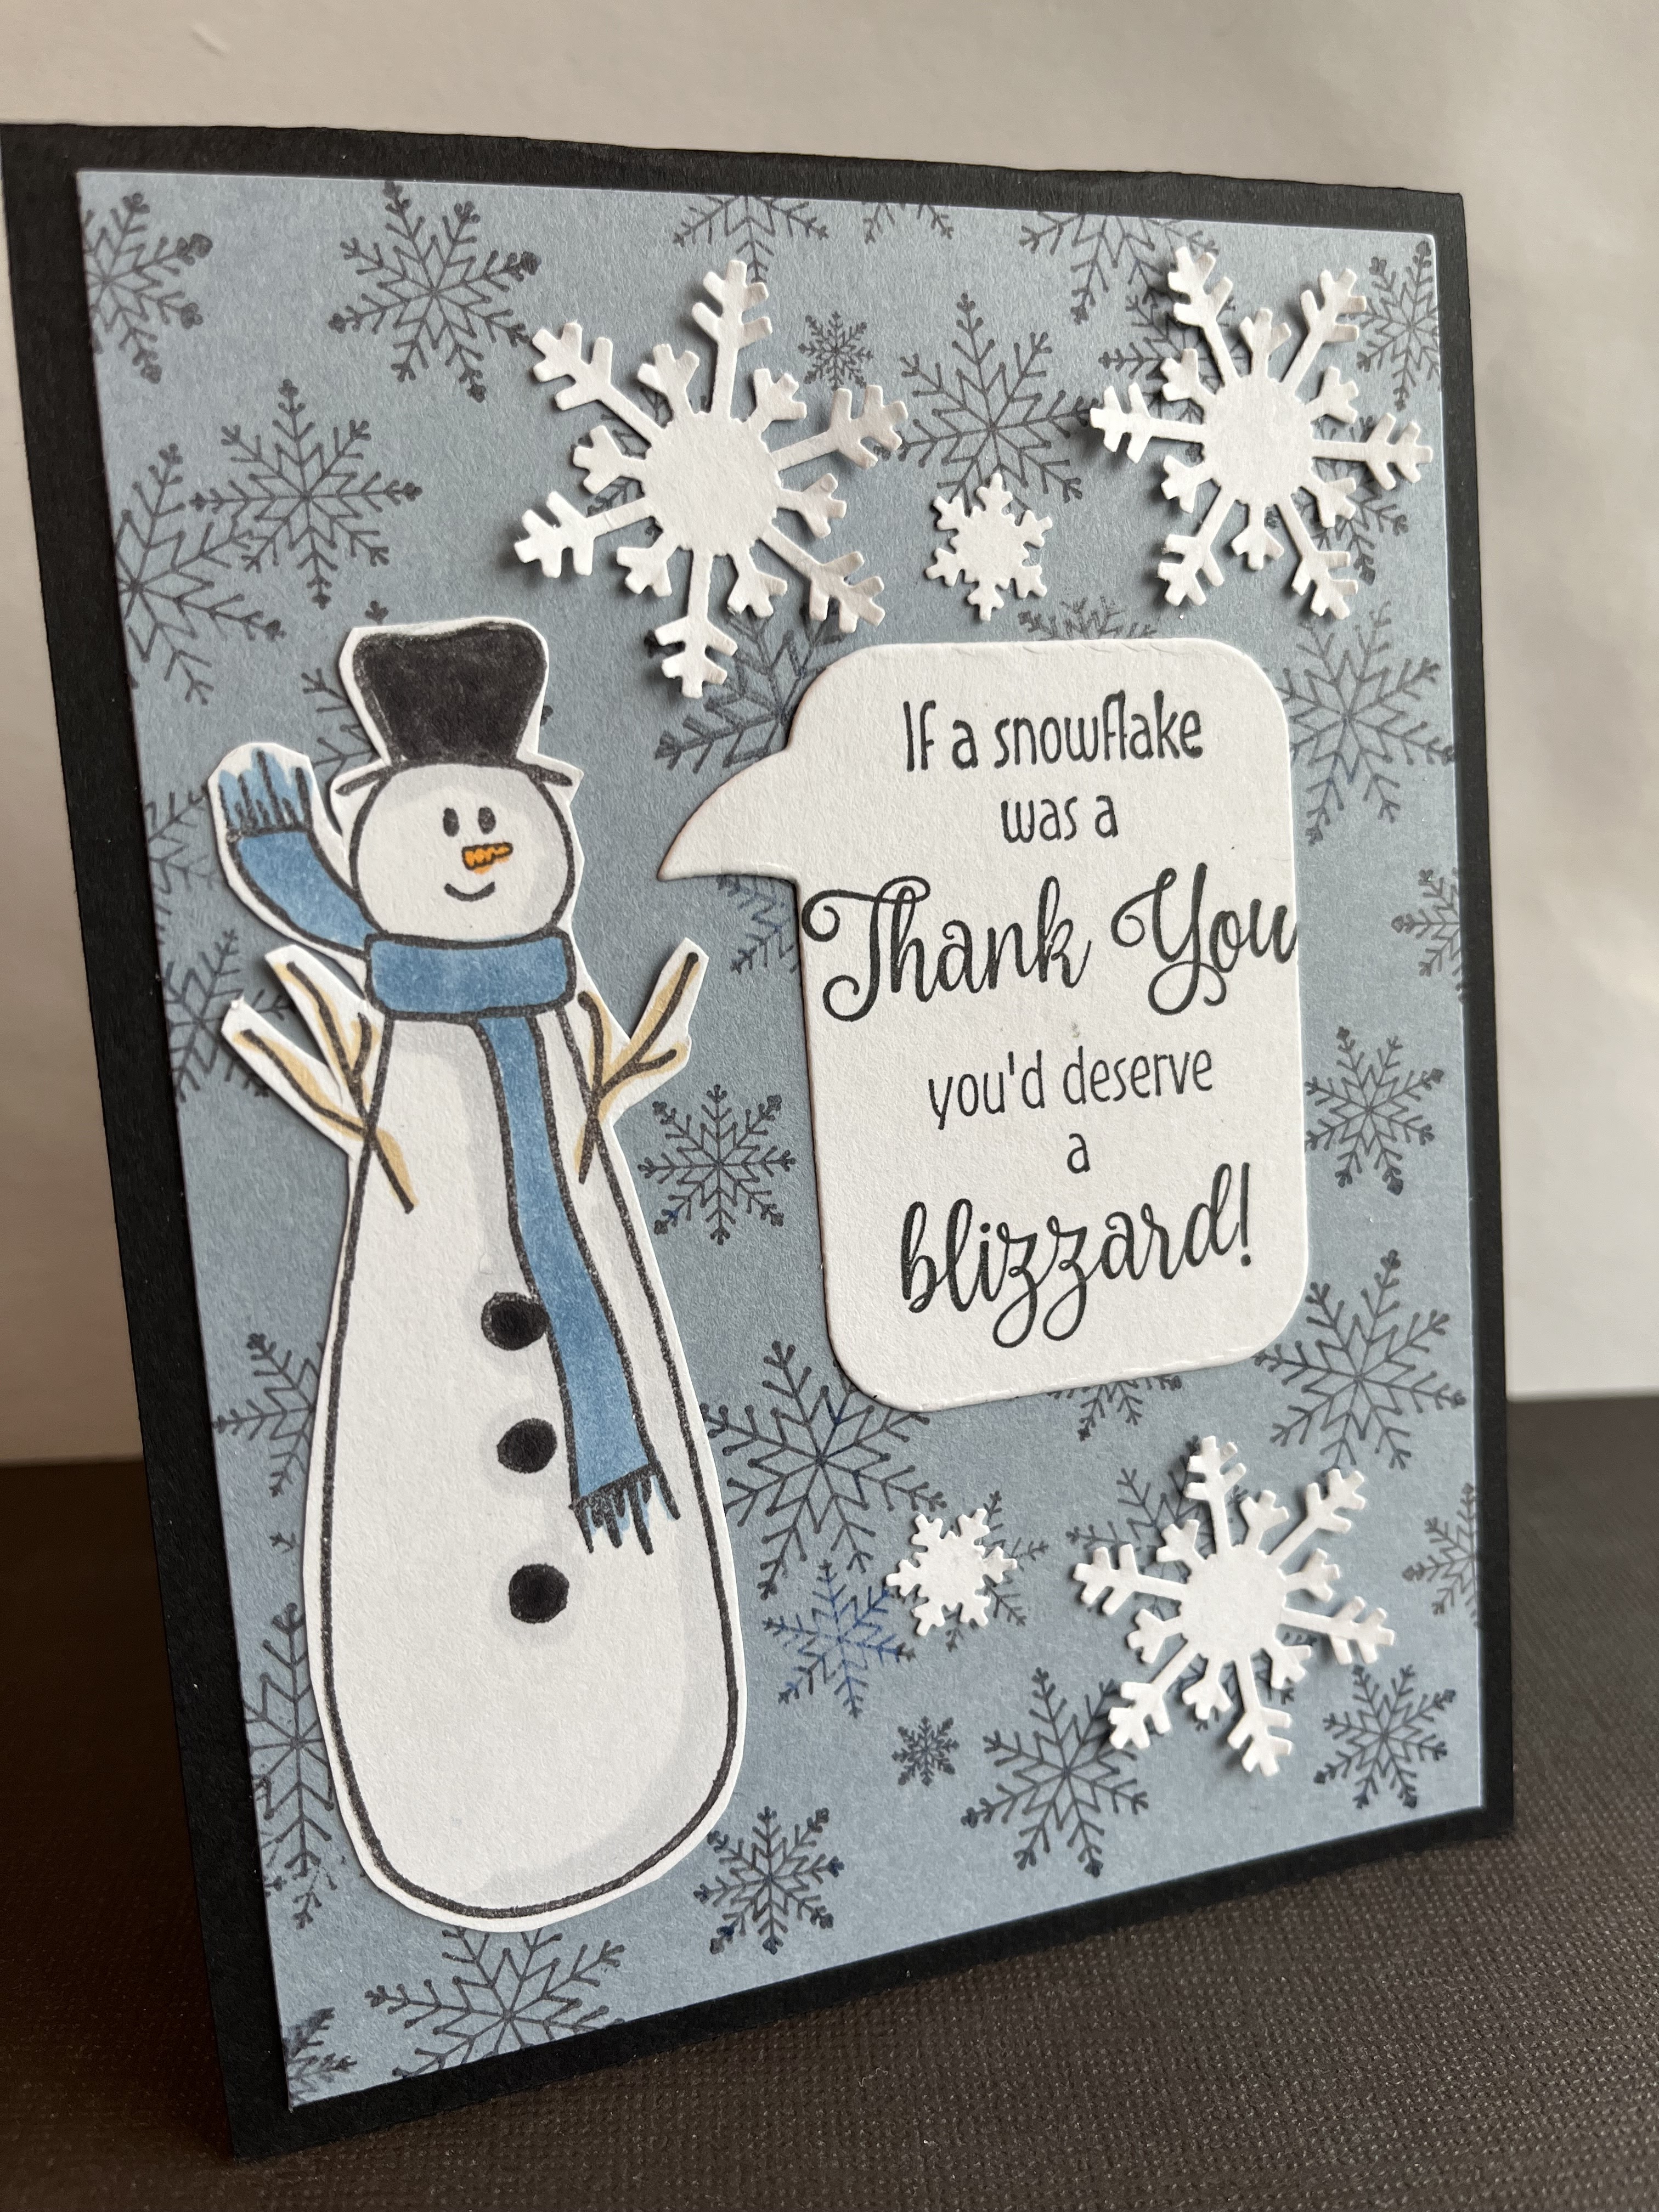
I'm still working on my holiday thank you notes, and since the Blizzard of Thanks Greeting was still on my worktable from this card, I used it for this one as well. 

I used the Interlocking Snow Background stamp on my blue base and stamped, colored and fussy cut Stretch the Round Button Snowman 


Instead of just a using a regular die to cut the sentiment, I chose a speech bubble for my snowman image because it seemed to make the card a bit more fun.  A few random snowflakes were added to play off the word blizzard, and then I called it done.  

Hope your new year is off to a great start!

Karin


Tuesday, June 20, 2023

Air Force


  Hi Everyone,

In keeping with the summertime and American colors of red, white and blue, I went ahead used them for this military card share.


The stars on my embossing folder matched the stars on the Star Wreath from DRS Designs, so that's how that choice happened.  I embossed both the wreath and the Air Force Proud emblem and then die cut them out, layering them on top of each other.


I used the Thank You For Your Service for my sentiment and colored in the stars and words on that, and the emblem with a red marker.  A few punched stars were added to finish it off.

Thanks for stopping by!
Karin

Tuesday, May 30, 2023

Army Proud


 Hi Everyone, 

I was in need of a couple of cards and had little time to make them, so I went with my favorite Dogwood Branch stamp that would work for both, and a couple of sentiments.  

I simply stamped the With Sympathy Greeting and the flowers multiple times, adding color by stamping using a small square ink pad.


I did the same here, but added a die cut Brush Thank You.  Some glitter glue was added for some flair.


Finally, I made another star filled card to honor our military, using the following stamps:


Thanks for stopping by!
Karin

Tuesday, August 23, 2022

From Our House


Hi Everyone,

After making this thank you card last week, I whipped up a second one, so that I wouldn't be caught without one, next time I was in need. 


It's pretty self-explanatory, just an embossing folder, some circle dies and a few cute stamps!


Bitsy Bumble Bee


Happy Bee


Beehive


 From Our House to Yours Greeting


All that this card needs when the time comes, is a thank you sentiment stamped inside!

Be sure to check out all of the bee themed stamps at the DRS Designs store!

Have a great day,
Karin


Tuesday, August 16, 2022

Thank You!

Hi Everyone, 

We were invited to dinner this past weekend, so here is a quick thank you card I made for them using stuff laying around my craft table.  I'm a messy stamper, but for once it made this card fast and simple.

I had my rectangle dies sitting out from making this card, and my Medium Daisy Bloom out from making this card here, all I had to look for was the Brush Thank You stamp.


I even scavenged the cardstock from a pile on my table, so all that was left to do was tie on some twine, add a die cut butterfly and write a note inside. 

Thanks for stopping by!
Karin


Tuesday, July 20, 2021

Popsicles


Hi Everyone,

Is there anything more summer like than popsicles?  I think not!  So I made a card celebrating that sweet summer treat.

I don't have a popsicle die, so I began by die cutting out rectangles and rounding off the top corners.  I used my word window punch for the two "indentations" on the treats and inked up the edges of all the papers for a bit of dimension, finally attaching some real sticks to complete them.


I layered them all onto an embossed citrus background, since in my mind the flavors were orange, lime and lemon. 

For the greeting, I chose the 1 Line So Sweet Greeting.

And YOU"RE so sweet for stopping by the blog today! 

Have a great one!
Karin


Tuesday, January 26, 2021

Winter Cards


Hi Everyone,

Since it's still January, I have a couple of simple winter cards to share today, using stamps from DRS Designs.  

For the first one, I paired the new It's Freezin' Season Greeting with a couple of my favorite snowmen in my stamp collection, Stretch the Round Button Snowman and Simply Snowman. I was going to stamp the greeting at the same time, and make a flat card, but changed my mind and made a medallion using my punches instead, attaching it when it was complete. After stamping and coloring the snowmen, I dry embossed on top, to add some snowy texture.


This is one of my holiday thank you cards that I mass produced this year. Since I was making a half a dozen, I went with a simple stamped background (Snow Background) and a large die cut snowflake.

The Blizzard of Thanks Greeting was stamped and heat embossed, with a touch of blue sponging around the edge.  I attached it with some dimensional foam tape and added a big half pearl to finish it off.


Inside I stamped the same snowflakes in a light blue.  


And here is a close up of the glittery embossing :)


Thanks for stopping by...

  Happy Stamping :)
Karin


Tuesday, September 1, 2020

Thankful

Hi Everyone,

I can hardly believe that it's September.  Even though we haven't gone anywhere this summer and the days felt long, now that we're heading into fall, I feel like the time has flown!  The cooler night time temperatures this past weekend, really put me in the mood for some card making.  I even snuck in some snow on my first card.  DRS Designs has some new fall stamps on the way this week, and I'm excited to give you a peek!

A couple of  the new 2 in 1 stamps allow you to be creative and stamp a whole scene.  I always need to give myself a pep talk before I start this type of project, but it was so easy to get great results. If I can do it, anyone can!

I began by stamping the mountains and then the tree line below it.  Next I stamped the Log Cabin, fence and filled in using the little bare trees. After coloring in everything, I made a mask for the house and stamped the the grass portion, finishing it up with some glitter and the greeting.  

Here is the list of stamps used:

Mountain & Tree Line 2 in 1 Scene (045P)
River Rocks & Fence Line 2 in 1 Scene (087P)


This card is right in my usual comfort zone.  One image, one sentiment and a layout of my choice :)

I dry embossed the base with a leaf embossing folder (Darice) and stamped a border using the
 Polka Dot Background.  I stamped it once in brown ink, and then used my stamp-a-ma-jig and lined up the green dots in between the spaces and stamped again,  for a slightly different look.   After stamping and coloring the new Sunflower Bucket (062F), I fussy cut it and attached it to a die cut.  I stamped the Thanks Be to God Greeting and layered that up using my punches.


Before I attached the greeting and image, I wrapped the background in a gauzy ribbon to finish it off.  

I hope this has got your fall cardmaking mojo going.  Be sure to check in here all week for more sneak peaks, of the new seasonal stamps! Have a great day...

Karin

Tuesday, August 25, 2020

Trick or Treat & Thanks

Hi Everyone,

While I'm not sure if Halloween will look the same this year, I'm hoping communities come up with some creative options for kids to dress up and celebrate safely. 

In that spirit of hopefulness, I made a card using the Ghost Family Portrait (which look like trick or treaters to me!) and the Small Trick or Treat Greeting. I simply die cut and matted both, and layered everything onto a background inspired by the colors candy corn itself. 


Inside I stamped and colored up the Candy Corn Border and matched it with the Favorite Veggie Candy Corn Greeting.


I needed a thank you for a friend, so I stamped, embossed and fussy cut the Polka Dot Flower, adding a gem to the center.  I die cut the word thanks in green, and attached it in place of the stem.  I framed it out and glued it onto an embossed background.  Super easy!


After I was done, I happened to notice that it actually looks cute in the horizontal direction too.


You can check out all of the newest Halloween stamps (and flower stamps too) over at DRS Designs!

Have a happy day :)
Karin


Tuesday, June 30, 2020

Heroes and Hearts

Hi Everyone,

I thought I would try a heart theme to go along with the You are my Hero Greeting on my today.

Beginning by stamping, coloring and fussy cutting the Wooden Frame Collection, I then went about choosing things to fill them with. Some pink and red punched hearts in one, the sentiment in another, and Bandages (heart embellished of course) and a butterfly (from the Three Butterflies) in the last.   


I attached them to an embossed heart background and I made a heart border for the bottom using the Scattered Hearts stamp.

For all of these stamps and many more, please check out the new designs page at the DRS Designs store!

Thanks for popping by...
Karin


Tuesday, June 23, 2020

Care Giver Cards

Hi Everyone,

I have a couple of cards in honor of care givers, specifically nurses and doctors.  
I used the 
A Nurse Brings...Greeting, and attached it to a background made using the Bandage stamp, and a strip embossed with hearts.  I decided to go all in with the heart theme, and added the 
Small Silhouette Heart to the center of the greeting.  For an image I stamped, colored and fussy cut  the Boo Boo Bear image, to which I added a glitter embellished heart. 


This was originally a nurse card, but once I made it, I realized nurses don't wear white coats, so a doctor card it is!  I cut a piece of cardstock in half, and folded down the inside corners for the coat. The shirt was a scrap of blue that I added behind the "V" and I glued on real buttons down the front.  I used my tag punch to make a pocket and the doctor items were stamped and fussy cut from the Medical Bag stamp.  In place of the name tag, I used the thank you that came from the 


The inside uses the sentiment, I just cut off the top part that mentions nurses, and added a punched heart to the bottom. 


You can find all of these stamps and many more at DRS Designs!

Have a nice day!
Karin

Tuesday, November 20, 2018

Thanksgiving Cards

Hi Everyone,

With it being Thanksgiving week, I have two cards that are holiday related, but on the simpler side.  If you're in a time crunch, these are for you ;)

An embossing folder, circle punches, and a die are what I used to highlight the darling little leaf image from the 4 in 1 Harvest Designs stamp from DRS Designs.  

I colored up the leaves and used a 1 3/4"circle punch to cut them out.  After embossing my background, I used the 1 1/4" punch to create the openings and glued the leaves behind them.  I then used the same size punches to create the little frames for each one, and added a simple die cut greeting to finish the card.  


For my second card, I stamped, colored and die cut the Pumpkin Thanksgiving Wishes greeting. I wasn't in the mood to do any lengthy coloring project, so I grabbed some washi tape and masked off a few strips on my background cardstock.  I then used some orange and yellow ink, and sponged the exposed areas.  After removing the tape, I stamped the Pumpkin Pile in brown ink and added a strip of glitter. 

I finished it off by adding the sentiment using some dimensional tape and a row of matching gems.  

Here's wishing you a happy holiday this week...I sure am grateful you took the time to visit the blog today!

Karin


Tuesday, May 15, 2018

Flower Power

Hi Everyone,

I admit I'm pretty bad about cleaning up after I stamp; I usually push my scraps and extras into a pile and deal with it at some later time.  It was from those scraps that this card was born.  I came across the negative part from some die cut flowers.  They were made for embellishment on another project, but before tossing them, I decided to use them as a stencil and create a floral thank you card. 

I chose some pastel ink colors and simply sponged the flowers in a random pattern.  I used the
Deco Thank You Greeting from DRS Designs in the corner, and embellished a few of the centers with some gems.


It was so easy and fun!  I think I may keep these and any other scraps in a little baggie for future stencil projects.


Here's another graduation card I made using the A New Beginning Greeting.  Choosing to play off the word time in the sentiment, I dry embossed the background using a clock themed folder, and added 3 of the Brush Mortarboards that were stamped and fussy cut.


After it was assembled, the greeting looked a bit sparse, so I inked up one of the tiny grad caps from the Graduation Background stamp and added it to the corner.  

Thanks for stopping by and Happy Stamping!
Karin


Sunday, April 29, 2018

Thanks a Bunch

Hi Everyone,

DRS Designs is getting ready to release some new stamps and I'm sharing a peek of a few of them today.   

The main image is the new Flower Wheelbarrow (629H) and I just colored it up with my Copic markers and die cut and matted it using some circle dies.  As usual, I made my backgrounds to coordinate with the flowers and used the new Flower Scroll (617F) and yellow ink and the Polka Dot Background for the strip. I completed the card by adding a die cut butterfly with dimensional foam tape. 


The Deco Thank You (623E) sentiment will be released soon as well, and here I used half on front, and half inside. 


I carried the flower and butterfly theme to the inside with the Three Flowers with Butterfly stamp.  I stamped off a couple of times on a piece of scrap, so that I would get a lighter shadow image.  

Thanks for peeking in today!
Karin


Tuesday, February 6, 2018

Happy Valentine's Day

Hi Everyone,

Here's a look at a Valentine that I whipped up a while ago.  It features the Valentine Scroll Oval  that I stamped and heat embossed.  I took a Copic marker and colored in a few of the hearts and flourishes, but other than that, I simply mounted it onto a card base that I made using a background die. (Darice Quatrefoil die) It was super easy, and I just added some ribbon and a few gems to girl it up. 


In keeping with the simple theme, I made a winter thank you card as well.  I stamped and embossed the navy blue background using the Snow Background stamp and some glittery embossing powder.  I die cut a large snowflake from some sticker paper, and coated it in some iridescent white glitter.  I then stamped, did the same heat embossing, and die cut the Blizzard of Thanks Greeting.  After adding a bit of sponging, I attached it to the center of the card. Completing the card are some glittery photo corners that were made in the manner of the snowflake.  

Inside I stamped the Brush Thank You and covered it in another blizzard of snowflakes.  


Other than many thanks, I hope the blizzards are in our past!  Wishing you sunny days...
Karin 

Related Posts with Thumbnails