Welcome!

My name, Karin, was pretty common when I was growing up...just not the spelling. Unless you are of German heritage like I am. So, I have spent my entire life answering the question, "What is your name"?... With, "Karin...with an "i"! Who knew it would come in handy all these years later when I went to name my blog.

Tuesday, January 12, 2021

Valentines

  Hi Everyone,


I love making Valentine cards each year.  They always make me smile due to the fact that they're usually fun, or punny or cute or all three!  I sure could use any and all lightheartedness during these times :)

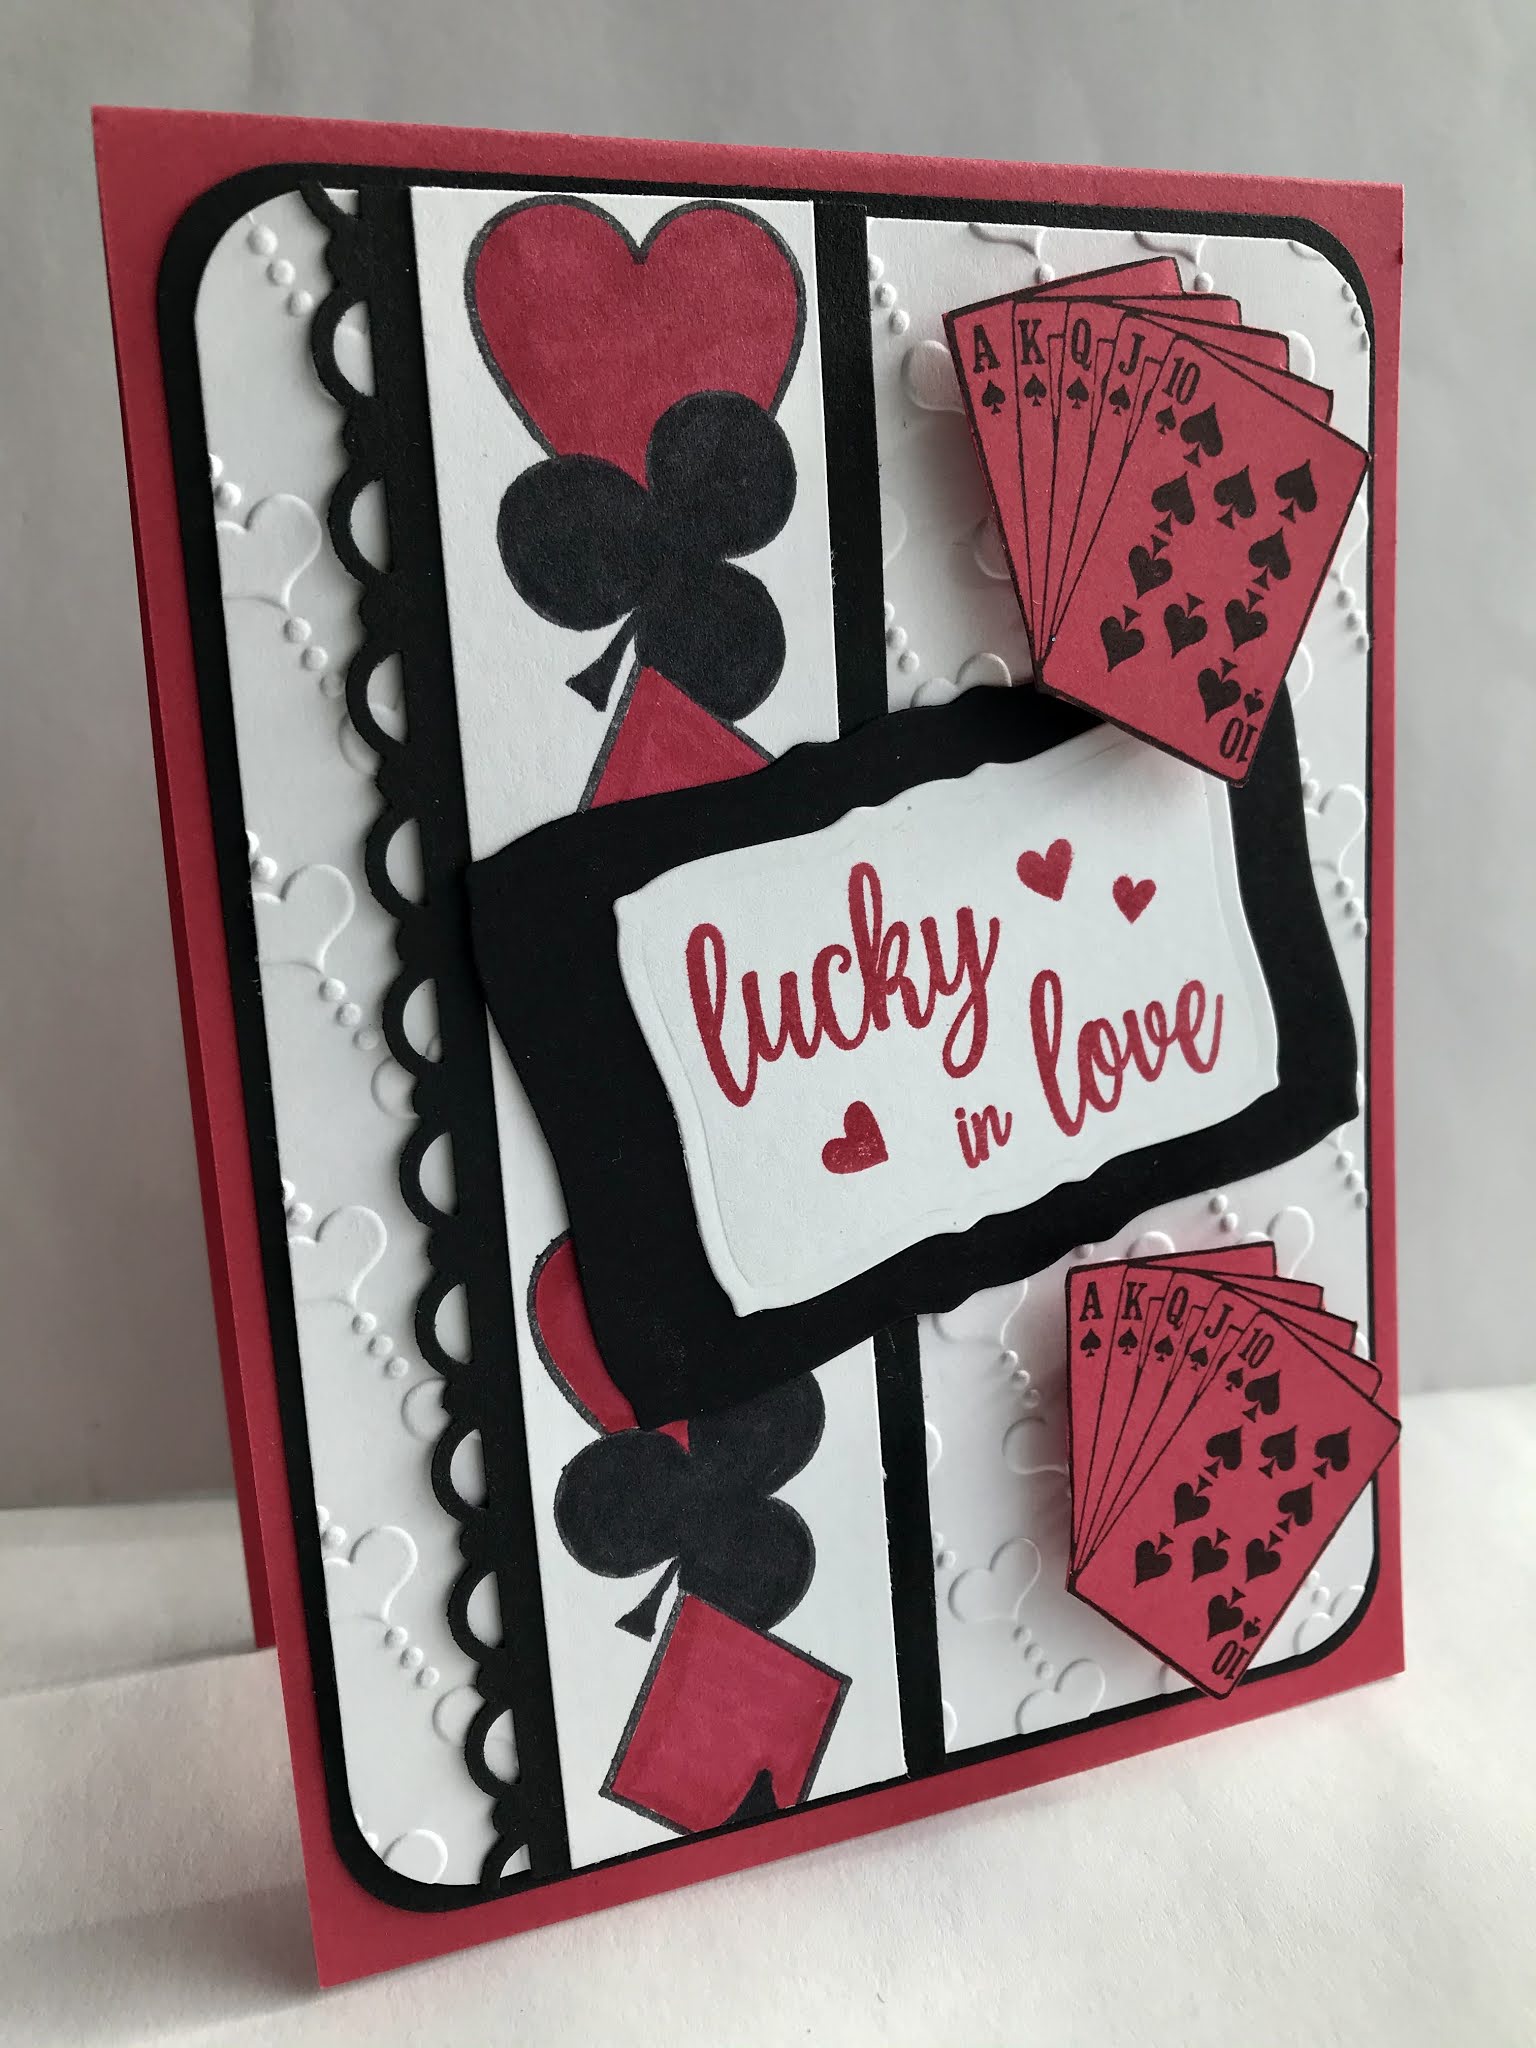
 I celebrated my 30th wedding anniversary last September, so I definitely think I'm lucky in love.  I'm usually the one who wins when playing cards too, so I paired the new sentiment up with a few card related stamps.  

I embossed the background and made a border strip using the 4 Suite Vertical stamp and a punch. I stamped a fussy cut a couple of the 5 Cards and attached them using some dimensional foam tape.  


This next card is so me.  I love pink.  I love puns.  I love bees.  I love sparkle!  Can I give a valentine to myself? 

I started by stamping the background by using the Flower Hearts stamp.  I then stamped it again for the focal image, die cut and colored it in.  I knew I was going to pair it with the new Bee my Valentine Greeting, so that of course meant adding some bees, using the Happy Bee and Bitsy Bumble Bee stamps.  


 I finished it off by adding some glitter to the bee wings.  Be sure to stop by the new releases page to see all of the new stamps!  

Time to get inky for Valentine's day!
Karin

Tuesday, January 5, 2021

Freezin' Season

  Hi Everyone,


Have you been enjoying seeing some of the new stamps that are being released here at DRS Designs?  These stamps I'm showing today are perfect for the month of January!  If you get them now, you can use them to get a jump on your holiday cards too :) 


This first card uses the Silhouette Skating Snowman.  I inked up the stamp once, and stamped it on the right side of my panel.  Using that same stamp again, without reinking it, I stamped it a couple more time to give the effect of movement.  I then sprayed the panel with adhesive and sprinkled it with iridescent, snowy glitter.


After framing it in red, I attached a strip along the side, embellishing it with a punched snowflake and the new greeting, It's Freezin' Season.  Which is crazy cute in my humble opinion!  I then attached it to a grey card base that was stamped using the Snow Background stamp and the same blue ink.


Here I used the new Skating Snowman and colored him up to match the Woven Plaid Background I made for him. I used green and blue ink for the pattern and added a strip of embossed snowflakes to the bottom.


I stamped and die cut the same sentiment, and added some twine and a snowflake button for embellishment..


Check out all of the newest stamps by clicking here and Happy New Year!

Karin


Tuesday, December 29, 2020

Happy New Year

 Hi Everyone,


We're only a few days away from turning the calendar, and I know I'm not alone is wishing 2020 good riddance!  Bring on the new year!

To celebrate, I made a card using the Sticky Note Calendar stamp.  I hand wrote the numbers and added some glitter glue to the first day to highlight the holiday and the January heading came from the January Birthday Greeting stamp.


For the background, I used the Interlocking Star, along with a star border punch accented with some glitter strips.  The happy new year greeting is a portion from the stamp 365 Days of Happiness.  

To finish it off, I simply added a star gem.

Cheers to 2021!
Karin

Tuesday, December 22, 2020

Frosty

 Hi Everyone,

Here's a look at the one paper crafted holiday item I made this year.  I was working on things over the summer for my niece's wedding and I made this rosette out of white paper.  It didn't work out for my favors, so I added some winter elements and made this ornament for the tree.

The rosette base was made from 2 strips of paper measuring 2" x 12", and scored every 1/4".  It was then border punched along one side, folded accordion style and hot glued together.   I stamped, colored and fussy cut the Medium Mr. Snowman image, attaching him to a few die cut and embossed circles of matching paper.  The word Frosty came from the Winter Wonder Words Greeting stamp.


And on the back I used the Snowman Especially for You stamp.


For my Christmas dinner, it will once again just be the 4 of us, so I copied myself and made the same favors I did in this Thanksgiving post, just using peppermint flavored chocolates and these stamps:


However you're celebrating this year, I'm wishing you a Happy Christmas!

Cheers!
Karin


Tuesday, December 15, 2020

Happy Retirement

 Hi Everyone,


I'm using the new Brush Happy Retirement Greeting from DRS Designs on my cards today, and I created a couple of  scenes to go along with it.  

Here I stamped and die cut the sentiment and set it aside while I made the rest of the card.  Whenever I get overwhelmed at the thought of making a whole scene, I go small like I did here.  I stamped the Chair first, sponged on the sky, and then just drew in the grass.  I then used the Single Fall Tree and added a border.  My background on the other part of the card was stamped using the Splatter Background stamp in inks to match the scene.  A bit of sponging on the sentiment, along with a ribbon and a few punched leaves completed it.


For this card, I colored and die cut the Sleeping Gnome, and attached it to a background that had a sponged sky and a stamped grass using the Easy Grass Background.


I stamped the greeting at an angle and added the Silhouette Leaf Branch in the background, to finish it off.  
Napping.  Now there's an activity I can get behind!

Thanks for visiting today!
Karin


Tuesday, December 8, 2020

New Home

 Hi Everyone,


I'm showing off a couple of the new stamps that have been released here at DRS Designs, and they celebrate one of the best milestones in life, getting a new home!  Whether it's purchasing a new place, or moving into an apartment, DRS Designs has got you covered :)

Here I stamped, colored and die cut the Just Moved House Key image.  I'm not sure it shows up in the photo, but I colored in the key using a silver gel pen, so it has that nice shiny metallic look of metal.  I paired that with an embossed background of keys, added a strip of glitter and a few gems to balance it out.


This card is a mini nod to my team mate Nancy. She made a card last week using a portion of the 
New Home Greeting, and I decided to borrow that idea.  She also makes the absolute best wreaths on her cards.  ( Just click here, here or here!)  Mine is not like hers, its simply made using a die (Spellbinders Shapeabilities) and some ink.


Here I continued the greeting inside and stamped the Just Moved House Key a couple more times.


Thanks for visiting today!  

Happy Holidays,
Karin


Tuesday, December 1, 2020

Have a Ball


 Hi Everyone and Happy December!


It was nice to take a break from working on Christmas cards, and these bowling themed cards brought back great memories of my mom.  Back in the day my mom was looking for a hobby, to socialize and get out of the house, so she joined a bowling league.  Mind you, she never bowled before in her life, but boy did she get good at it.  She has been gone 15 years, but  my dad still has her trophies in the basement :)   


Here I stamped the background using the bowling ball image from the Strike! 3 in 1 Bowling Designs stamp.  I added a "bowling lane" along the side using the Floor stamp and fussy cut the Bowling Strike, attaching them with some dimensional tape.  I then stamped and cut one extra pin, and attached that to the image for more dimension.  
I stamped and die cut the Bowling Birthday Greeting and added 3 enamel dots to finish it off.


Inside, I once again stamped the ball image and added the fun, Ball on Your Birthday Greeting.


Here is one more bowling card, using the Ball on your Birthday Greeting on the front.   This time I stamped the pins from the Strike! 3 in 1 Bowling Designs along a strip and then layered the ball image from that stamp onto some punched circles. 

Be sure to visit DRS Designs for these stamps and for lots more stamping ideas too!
Have a great day!
Karin


Tuesday, November 24, 2020

New Home

  Hi Everyone,

I have a quick post today, because I still have so much to do.  While my Thanksgiving table will only have four around it this year, I'm grateful for each one.  And because I'm still having more than just me, I will be cooking a turkey and all the traditional sides :)  


I used fall inspired colors for my new home card today.  I was looking through my stamps for a house image, and decided on the Snowy Birdhouse because it was a seasonal one.  I colored and die cut it, along with the New Home Greeting.  For the background, I stamped it up using the Small Pinecone image and added some glitter glue and a die cut leaf to complete it. 


Even though I'll be celebrating my holiday with only three other people besides myself, my table wouldn't be complete without a favor.  I found these chocolates at the grocery and decided to cover them up make them more festive. 


I cut the paper into 3"x11" strips and stamped them using the Splatter Background.  I scored it along the center bottom in a couple of spots to wrap around the package and used a hole punch to thread in a ribbon on top. 


I stamped the Script Happy Thanksgiving and the Medium Silhouette Leaf in a die cut oval and attached it with some dimensional foam tape.  

Be sure to pop on over to the DRS Designs store to see all of the newly released stamps...

Cheers for a Happy Thanksgiving, the greatest eating holiday of the year!

Blessings!
Karin


Tuesday, November 17, 2020

Thinking of You

 Hi Everyone,


I love seeing a cardinal in winter.  There's just something about seeing that bright red color against a snowy white backdrop that just lifts my spirits.  

One of the newest stamps that was released for this holiday season DRS Designs is the Cardinal Holly Lantern.  
Fun to color and beautiful for crafts and cardmaking this winter season, I die cut the image and attached it to a background that was half stamped with a Pine Bough and half dry embossed.


I used the new Thinking of you at Christmas Greeting, which is one that I will be stamping with a lot this year.  


And speaking of that sentiment, I challenged myself to make another card using it, only this time to make something super quick.  I used my watercolor brush, a holly leaf punch (Martha Stewart) and some enamel dots for the images and I stamped and cut up the sentiment.  


I liked that so much that I tried again, this time using one layer, a snowflake punch (Martha Stewart) and the Tiny Seasons Greetings stamp.


I'm famous for running to my craft area to whip up a last minute card.  Now at least I have an idea for one!

Wishing you a crafty holiday season...

Karin


Tuesday, November 10, 2020

The Beauty of the Season

  Hi Everyone,


We did a lot of work remodeling the outside areas of our home this year.  We removed our deck, brick walkway, and pine trees and put in a paver patio, fire pit and fence.  The deer are so confused, we see them standing on the outside trying to figure out what happened to their usual thoroughfare.  For me it has been a joy to have some fall flowers and even a bird feeder that they can no longer eat and empty!


This has inspired today's card.  I stamped and heat embossed the background using the Interlocking Snow Background.  The Beauty of the Season Christmas Greeting and Bird Feeder image were stamped, and then die cut to create one central panel for the front of the card.  


After coloring the image, I also stamped and colored the Small Pinecone, which I fussy cut and attached to the card along with some ribbon.  To finish up, a bit of glitter glue was added to the pinecone tips for a snowy embellishment.

Thanks for dropping in to visit!

Karin


Tuesday, November 3, 2020

 Hi Everyone,

Now that it's November, I did my first bit of holiday preparation yesterday.  I unpacked my Christmas dishes in anticipation for December dinners.  It's generally the first thing I do, since they're behind cupboard doors, so no one but me knows.  One year I did put up my tree before Thanksgiving though, but I was pretty tired of looking at it by the time Christmas rolled around, so I'm not doing that again. I will continue to decorate on Black Friday, it keeps me out of the stores and it's been my tradition since I was in college.

On that note, here is my card using the new Potted Christmas Tree stamp.  After coloring and die cutting it, I went and embellished the ornaments with some glitter glue for a bit of sparkle.  The background and tiny tag were stamped using the Interlocking Snow Background, and then I stamped the tag using the Tiny Season's Greetings.

I die cut a big snowflake and used a solid ribbon for the tag and a printed ribbon along the bottom of the card.  One pink gemstone finished it off.


The month of October had me going to two drive by parties, one birthday and one baby shower.  So very 2020, am I right?!

Anyway, I made this cheerful piggy card for the birthday celebration.  Leonard Pig Behind the Bubble is the star of the card.  I colored him up and used my circle dies, along with the Delightful Surprises Birthday Greeting and I added some glossy accents to the big bubble.


And in keeping with the circles theme, I used the Interlocking Circles stamp to create the background.  

Here's wishing you a delightful day!

Karin

Tuesday, October 27, 2020

Shell-ebrate the Season

 Hi Everyone,


I can say that I've never celebrated Christmas anywhere that looks like the scene on my first card.  It's always cold and snowy where I live, so I'll just have to travel to the tropics via my crafting, for the foreseeable future. 

I had fun using the same gnome themed stamps on the two cards I posted last week, so I thought I'd try that again, only this time using a seashell theme.  Here I created a scene using the Mountains and Silhouette Palm Tree Line, which I masked off in order to sponge in the sky.  I simply used my Copic markers to color in the rest of the scene, adding some ripples in the ocean using a white gel pen.

For the Shell-ebrate the Season Greeting, I stamped the Wooden Frame Collection first and then added the sentiment before fussy cutting it out and coloring it up.  Finally the starfish and shell were stamped using the 4 in 1 Seashells.


This second is is obviously not as time consuming to make, but I thought it would be fun to use the seashells and make a card in traditional Christmas colors.

I used a 1" punch for the shells and the embossed portion was made using a seashell embossing folder from Darice.  


The only extra I added is that tiny piece of twine.  

Are you finally thinking about holiday card making?  Be sure to stop on over to DRS Designs so see what's new in the world of stamping!

Thanks for stopping by!

Karin

Tuesday, October 20, 2020

Gnome for the Holidays

  Hi Everyone!


I feel so lucky to be able to give you a peek at one of the new sentiments that is being released this week.  The Tiny Gnome for the Holidays Greeting is perfect for the collection of gnome stamps here at DRS Designs. 


Here I stamped the Tree Home Gnome and colored it up, adding some lights to his place of residence

that were fussy cut from the Christmas Light String.  


The background was stamped using the Large Original Plaid stamp and some black ink.  By stamping on a colored piece of paper, you get the a two color look by only using one ink. I added a punched border along each side and embellished it using a printed ribbon and a snowflake brad.


For my second card, I wanted to keep with the gnome theme, and showcase the same sentiment, so I stamped the Toadstools around the perimeter of the background and colored them in very loosely using a watercolor brush.  I did the same with the Mushroom Line Background and added the Peeking Gnome that was colored and fussy cut.


In the spirit of this adorable gnome, thanks for peeking in today!  To see all of the new stamps, just click on over to the store!


Have a great day :)
Karin


Tuesday, October 13, 2020

Count Your Blessings


Hi Everyone,


Just like last week, I have a card featuring the Laid Out Scarecrow...He's just beyond cute!


What can I say?  He and the World Changed Thankful Greeting paired up together, were all this simple card needed.   To make them fit inside the die cut, I masked off the Happy Thanksgiving portion of the stamp, and I attached the panel to an embossed pumpkin background.


The hanging banners with the dots were made after I colored up the scarecrow, using the same orange and blue Copic markers, so that they would match.  


Here's hoping we can be thankful for the rest of the fall season!

Karin

Related Posts with Thumbnails