Welcome!

My name, Karin, was pretty common when I was growing up...just not the spelling. Unless you are of German heritage like I am. So, I have spent my entire life answering the question, "What is your name"?... With, "Karin...with an "i"! Who knew it would come in handy all these years later when I went to name my blog.
Showing posts with label Halloween. Show all posts

Tuesday, October 31, 2023

Happy Halloween

                                                                          Hi Everyone,


I have one last Halloween card to share with you since today is the big day! I can't wait to see what the neighborhood kids come dressed up as!


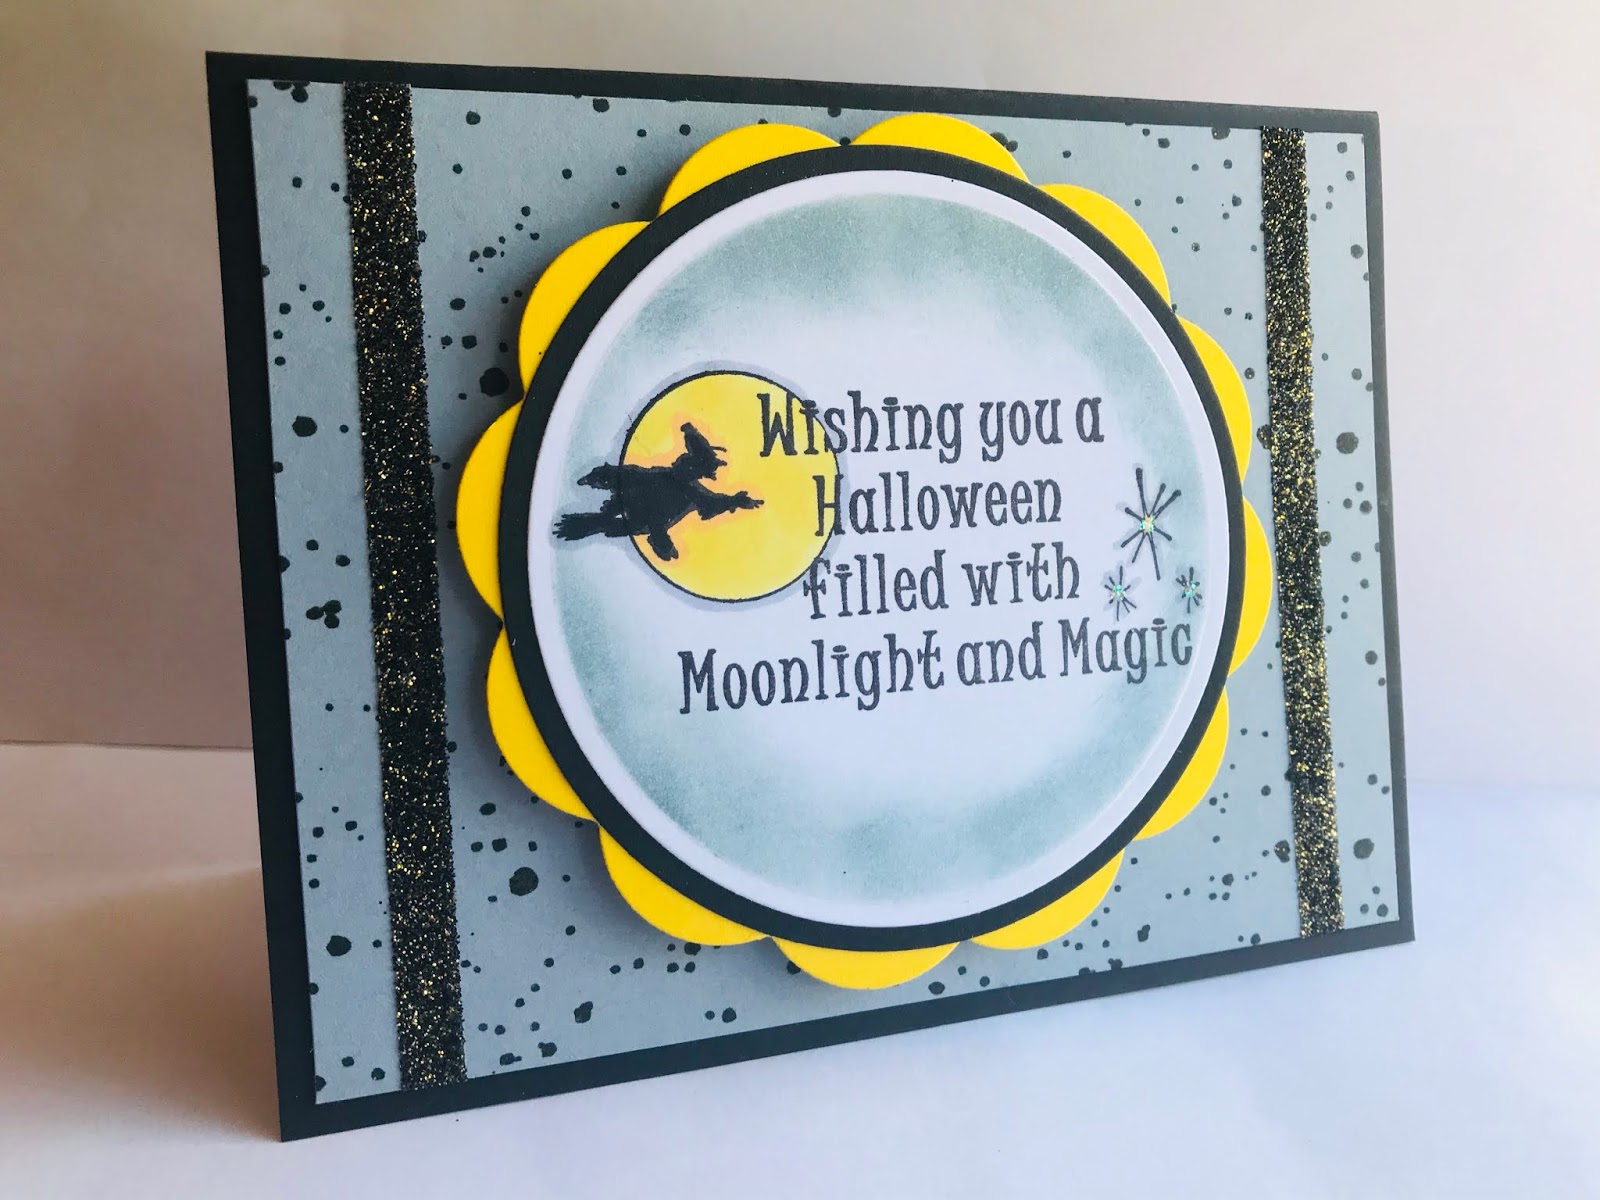
I stamped and colored up the Spooky Jack Halloween greeting, adding some sponging after I die cut it out.  I then stamped and fussy cut the Fancy Pumpkin, adding some glitter to his hat.  I wrapped the greeting in a die cut vine and layered it onto a background that was stamped using the Starry Background. 


Usually I add some gems as embellishment to finish off a card.  Today I had to add them to cover up a boo boo I made at the very end of the cardmaking process. Sigh. I may go back and see if I can add some more vines in that spot instead.

Happy Halloween!
Karin


Tuesday, October 17, 2023

Scary


 Hi Everyone,

I have a quick Halloween card share today.  It's pretty self- explanatory, but I stamped and die cut the So Spooky It's Scary Greeting and matched it up with a die cut skull.  It doesn't show up in the photo well. but I added white glitter to the big skull and the small ones in the greeting. 


I added red gems to match the drippy blood and I finished it with some googly eyes.  

Be sure to check out all the new stamps from DRS Designs right here!

Happy Stamping!
Karin


Tuesday, October 10, 2023

Happy Halloween


  Hi Everyone,

The jack o lantern that's part of the new Spooky Jack Halloween greeting, reminded me of the one that's part of the Witch Gnome stamp.  So, I went ahead and paired them up on my card today.  

For my backgrounds, I stamped, and heat embossed the Empty Spider Webs first, and then stamped and colored up the greeting on my white background paper. I then used the Starry Background and stamped the purple stars, doing my best to avoid getting stars inside the pumpkin image.  

I used some circle dies on my gnome and attached him on top of the border that was embellished with a strip of patterned ribbon.  

I have my pumpkin ready to be carved, purchased my Halloween candy, and found my cat ear headband that I wear every October 31st, so I'm all ready for the trick or treating!

Thanks for stopping by!

Karin


Tuesday, September 12, 2023

Spooky

 Hi Everyone,

My card today was an attempt at using up some of my paper scraps.  I save extra paper and scraps in folders marked with the general name of the color and have grand plans for using them up.  That rarely happens.  Until such a time as this, when they are bursting at the seams!

Anyway, I used my circle punches in various sizes and papers in Halloween colors for the background.  The greeting is new from DRS Designs, (So Spooky It's Scary Halloween Greeting 218E) and I die cut it and added some orange ink as well.  


After attaching the circles, I tied on a bit of orange ribbon before attaching the sentiment with some foam tape.  To add to the Halloween theme, I attached a left-over Leaning Ghost and a couple of die cut bats.  

Thanks for visiting today!
Karin


Tuesday, September 5, 2023

Happy Halloween

 Hi Everyone,

Now that Labor Day has come and gone, and even though it's still warm outside, I'm ready for change. I'm on to putting up my fall decorations and making holiday cards!

DRS Designs has some wonderful new fall themed stamps coming soon to the store!

Here I'm showing the Spooky Jack Halloween (224F) stamp.  I love that it's an image and greeting all in one, so I layered it onto an embossed background and die cut some zig zags to play off the jack o lantern's mouth.  A few colored gems finished it off.  


Next up is the new Beware Window (1987H) which I colored up and die cut.  I added a drippy border to match the dripping on the bottom of the window, and since I had the zig zag dies out on my table, I added that along the top on this card too. 


Before attaching all the elements, I stamped the background using the Spooky Eyes and added a die cut ghost, along with the Leaning Ghost that was stamped on vellum and fussy cut.

Have you started making your fall cards yet?  Now is definitely the time....Before we know it, we'll be on to Christmas!

Happy Stamping!
Karin


Tuesday, October 25, 2022

Trick or Treat


Hi Everyone,  

Since Halloween is next week, it thought it was time for me to share something on that theme.  

Whenever I host at my house, I like to send my guests home with a small treat.  This time of year, my go to take home gift is pumpkin bread, but I ran short on time for elaborate packaging.  I had 12 of these bags leftover from a long-ago Halloween, and they fit the mini loaves perfectly, so I dressed them up with a ribbon and tag made using the Small Trick or Treat Greeting. 


I found I made one too many tags, and also had a piece of ribbon left over, so they made their way onto a Halloween card.

The background was stamped, and heat embossed using the Interlocking Star Background, and the main image was made using the Goblin stamp.  I stamped them on top of each other, colored them up and added googly eyes.


Happy Halloween!
Karin

Tuesday, September 14, 2021

Halloween Gnome


Hi Everyone,

This past weekend we marked 20 years since that terrible day on 9/11.  Reliving it in my own thoughts, watching coverage on tv and talking with loved ones, I really couldn't do scary or spooky when it came to my crafting time, so I went cheerful for my Halloween theme instead.  


I knew a gnome would lift my spirits, so after stamping and coloring the Peculiar Pumpkin Patch, I decided to add the Peeking Gnome for fun.  He was fussy cut and made more festive by swapping out his hat for the one from the Witch Gnome.


The card base is a simple orange and yellow, with a die cut pumpkin vine glued on top.  For the sentiment, I stamped the Halloween Gnome Greeting and die cut it in the shape of a pumpkin and added it to the corner of the vine.  A few gems we added for design balance. 

Do you like this gnome themed card?  Be sure to stop by DRS Designs to get your stamps today!

Thanks for stopping by!
Karin

Tuesday, September 7, 2021

Halloween Cards


Hi Everyone,

I'm still at work on some more Halloween cards this week, so here are a couple of my recent creations.

Even though I embellished this with some sequins, I would consider this a CAS card...at least when it comes to what I usually make.  I stamped the Silhouette Witch Cauldron on a lavender base and then added the greeting. 

I stamped the Brewing Halloween Greeting in black and added the Bubbling Beaker in lavender to keep the monochromatic look.  I attached it with some dimensional foam tape and added a die cut spider.


This card was made by stamping and heat embossing the new Beware Crow stamp.  I ended up fussy cutting it for a whole other card design. Alas, it did not go as planned, so I ended up gluing it to some oval die cuts, for use on this card here.


The background was made using the Starry Background and the Spooky Eyes Background in grey and orange inks.  I wrapped it with some black lace and finished it with a die cut bat for embellishment. 


Thanks for stopping by!


Karin

Tuesday, August 31, 2021

Happy Halloween


Hi Everyone,

With September starting tomorrow, fall will be here before we know it, and in my house, Halloween is the kick off to the holiday season.  I've extoled my love of candy corn previously here on the blog, and next to candy, stamping is my another of my favorite things for the holidays.  

This first monochromatic card features the new Halloween Crow/Witch Frame, which was stamped, heat embossed and die cut using a rectangle die.  I layered it all up using dimensional foam tape and attached it to the card base stamped using the Accent Bats.  A simple strip of black glitter finished it off.  


Since my rectangle dies were still out on my craft table, I used them again on my second card.  I decided to feature the Witch Books and Hat, so I stamped, colored and fussy cut it out.  I dry embossed the first rectangle layer, and stamped the second using the Spooky Eyes.  The background was stamped using the Empty Spider Web and my drippy goo punch has to make and appearance, at least once a season.


I added two purple strips of glitter and for the sentiment, I used the beginning portion of the Witches Brew Halloween Greeting, to match the whole magic spell theme of the card. 

Be sure to check out all the Halloween goodies at DRS Designs!

Karin


Tuesday, August 24, 2021

Witch Gnomes


Hi Everyone,

I'm in love with this adorable Halloween Witch Gnome!  Isn't he cute?! This stamp is one of the new stamps just released and it goes perfectly with the Halloween Gnome Greeting too.

Too cute to stamp just once, I made him a triplet and colored them up.  For the background, I had a scrap of paper that had a hole punched out, so I used that as a stencil and sponged on some Halloween colors.


To finish it off, I punched out the greeting with the same size circle punch, and then attached it with dimensional foam tape.

I wasn't done stamping gnomes, so here I colored and fussy cut one out.  I wanted to use the new Enjoy the Ride Greeting, so I placed the little Witch Gnome on a Broom and attached it to a Starry Background, for his magical ride.


Lastly, I added a die cut bat for embellishment! Ta-da :)

There are so many wonderful Halloween stamps to be found in the online store...Be sure to check out all the spooky fun!

Thanks for stopping by,

Karin

Tuesday, August 17, 2021

Drop in for a Spell


Hi Everyone,


I could not be more excited to craft with these new Halloween stamps that are being released at DRS Designs on the 18th of this month.  Give me all things fall, because I am HERE for it! The grocery store is setting up its candy aisle, and I want it all.  Frankly, one year they were setting up after July 4th, (not THAT is crazy) so I'm totally not mad about a mid August display this year.


Anyway, I knew I wanted to ink up the Silhouette Witch Cauldron (716K) first, so I began by inking up my background in Halloween colors, and then stamping over it using the Splatter Background stamp.  I then stamped and heat embossed the witch on top.


I added the Drop In For A Spell Greeting at the top and the Magic Potion Shelf at the bottom.  Those were also heat embossed and fussy cut before attaching them to the base. 


I attached the panel to a card base stamped using the Empty Spider Web stamp and added some swirling gems for the heat coming off the cauldron.  


Be sure to keep tabs on the DRS Designs blog all week.  We're thrilled to be showing you all the newest stamps coming out tomorrow!


Stamping hugs :)
Karin


Tuesday, August 25, 2020

Trick or Treat & Thanks

Hi Everyone,

While I'm not sure if Halloween will look the same this year, I'm hoping communities come up with some creative options for kids to dress up and celebrate safely. 

In that spirit of hopefulness, I made a card using the Ghost Family Portrait (which look like trick or treaters to me!) and the Small Trick or Treat Greeting. I simply die cut and matted both, and layered everything onto a background inspired by the colors candy corn itself. 


Inside I stamped and colored up the Candy Corn Border and matched it with the Favorite Veggie Candy Corn Greeting.


I needed a thank you for a friend, so I stamped, embossed and fussy cut the Polka Dot Flower, adding a gem to the center.  I die cut the word thanks in green, and attached it in place of the stem.  I framed it out and glued it onto an embossed background.  Super easy!


After I was done, I happened to notice that it actually looks cute in the horizontal direction too.


You can check out all of the newest Halloween stamps (and flower stamps too) over at DRS Designs!

Have a happy day :)
Karin


Tuesday, August 18, 2020

Spooks and Spiderwebs

Hi Everyone,

As the title of the blog says, my cards today are loaded with spiderwebs and ghosts.  Sometimes when I'm done making a card, rather than put the stamps aside, I try and create something different using some of the same stamps.

For this first card, I made the oval image by stamping the Small Trick or Treat Greeting and surrounding it using the Small Flying Ghost stamp.

I dry embossed the bottom and stamped the Empty Spider Web in the corner of the top, adding the spider from the 4 in 1 Halloween Silhouettes stamp.  I added a few strips of black and yellow glitter and finished it with a die cut spider and a few gems.


This second card was a pretty quick and simple one made using the Empty Spider Web stamp for the background, and a die cut frame and ghost.


Here I tried for a close up of the glittery ghost and the Spirit of Halloween was stamped onto a banner for the sentiment.


And inside I completed the card using the Frightful & Delightful Halloween Greeting and another Small Flying Ghost.


Thank you for visiting and I'm wishing you a day that more delightful, than frightful!

Karin

Tuesday, August 4, 2020

In the Spirit

Hi Everyone,

I thought I would do a punny take on the new In the Spirit of Halloween Greeting, and match it up with an embossed martini glass background.  I needed someone to drink that martini, so I stamped,  heat embossed and fussy cut the Mummy.  And I figured he would have been having that drink at a party, so I gave him a witches hat for a costume. (The hat was fussy cut from the Broomstick Stella Witch stamp.)  I simply finished the front by adding a couple of die cut bats.


I embossed a white panel again, and the added the Drink Up Witches for the inside sentiment.


Cheers to Halloween!  

Thanks so much for visiting today!

Karin

Tuesday, July 28, 2020

Happy Halloween

Hi Everyone,

One of my favorite ways to use tiny stamps is to use my punches to bring them
life!

I used the 4 in 1 Halloween Silhouettes and punched them out using my circle punches.

I embossed the background using a Darice folder and added a punched borer.  The sentiment was punched as well using the Small Trick or Treat Greeting


Here I used a square punch along with the Small Flying Ghost.  The Pattered  paper was made using the Interlocking  Circles.  


I used the Happy Halloween to finish it off.  

Happy Halloween!|
Karin

Tuesday, July 21, 2020

Halloween Cards

Hi Everyone,

I had so much fun stamping with these new Halloween stamps.  I think I say this every year when making cards for the fall season, but it is my favorite time to make cards!  Thoughts of cooler weather, the rich colors, the sun setting sooner and the candy treats are some of the things that make me look forward to the coming months. 

I started this card knowing I wanted to use the Silhouette Halloween 3 in 1 Tree, so I sponged a purple background, masking a spot for the moon.  Along with the new tree stamp, I used the
 Spooky Tree Limb and the Accent Bats to fill out the scene.

The new Frightful & Delightful Halloween Greeting, along with the glitter embellished 
Leaning Ghost, was stamped and added with some dimensional foam tape.


For my second card, I began by stamping the Moonlight & Magic Halloween Greeting, embellishing it by stamping the witch from the 4 in 1 Halloween Silhouettes, in the moon. Playing off the shape of the moon, I used a circle die cut and matted it in yellow and added some blue sponging for the sky.

For the background, I used the Splatter Background stamp and added two strips of black and gold glitter. 


Keep checking in with us here at the blog for more Halloween cards, and to see all of these stamps, just hop on over to the DRS Designs store!

Have a great day!
Karin


Tuesday, October 29, 2019

Pumpkin Spice

Hi Everyone,

With Halloween fast approaching, I was running out of time to make a card celebrating my love of hot drinks. This cute Paper Coffee Cup can be decorated for any time of year, and I was remembering making a snowman type cup for this card, so I wanted to replicate that in some way for the fall. 


I made the background using an embossing folder (Darice brand) with fall words and made patterned paper for the bottom portion using the Candy Corn Border stamp and Copic markers. 

The cup was made by stamping it and decorating it using the Splatter Background stamp in candy corn colors.  Then I stamped it two more times, once on white and once on orange, fussy cutting the lid, sleeve and cup, and then assembling them like you see here. Since the sleeve was orange, I used that as my "pumpkin", attaching a yellow face.  I have a jack-o-lantern die (Darice brand), and those were the negative parts left over, but I did have to do a bit of extra cutting to make the mouth fit the cup.

I paired it with the Pumpkin Spice Everything Nice Greeting that was stamped and die cut and I attached that, and the cup, using dimensional foam tape.  Since the end of the greeting states "everything nice",  I resisted my urge to add a creepy spider as embellishment...lol.

Cheers to hot drinks!  Happy stamping...
Karin 


Tuesday, October 1, 2019

Halloween Scream

Hi Everyone,

I'm struggling with an injured finger, and while it's taking it's sweet ole time healing, it's been a challenge to stamp and type.  Hence, the short and sweet post.  And the super CAS cards.  Lucky for me the stamps from DRS Designs are cute, and completely saved the day :)

This first one features a die cut along with these two stamps:


The stamps I used for this one:
Favorite Veggie Candy Corn Greeting


Thanks for being sweet and visiting today!
Karin

Tuesday, September 24, 2019

Cards and Halloween

Hi Everyone,

It's been a crazy busy week, so unsure of whether I'd be able to find time to make a fall card, I thought I'd show off the anniversary card I was able to make for my hubby.  
I always beat him at cards, so I came up with this pun, which I cut using my alphabet dies.
  I stamped and die cut the 5 Cards stamp and created the bottom of the card using the
 4 in 1 Poker Suits stamp and coloring in the hearts and diamonds. 

I added a strip of gems and pearls along with a punched heart and photo corner.  


For the inside I used the Happy Anniversary portion from the Love is More Precious Greeting and the 
4 in 1 Poker Suits again in the corner.


However, I remembered making this Christmas card when I was in a time crunch, so I started with that simple idea and was able to squeeze in making this easy Halloween card. 

I was starting with an orange base, so I added some orange water coloring to the bottom corner of my white paper, dry embossing it after it had dried.  I glued on my die cut cat and added the 
Purrfect Halloween Greeting that was die cut and embellished with ink to match. 


The bottom corner was blank and needed to be balanced out, so I added the Broom that had been colored and fussy cut.

If you're making fall and holiday cards, be sure to visit the DRS Designs store.  For a limited time shipping is free on purchases over $25.00!

Have a great day!
Karin

Tuesday, August 27, 2019

Halloween Greetings

Hi Everyone,

By using the Wooden Frame Collection stamp from DRS Designs, I was able to cram all kinds of Halloween goodness onto my card today.

The background was made using the Spooky Eyes Background stamp, along with a cut and stamped piece of angled grey cardstock, stamped using the Empty Spiderweb. I added a piece of patterned ribbon to cover the seam and attached it to the yellow base.


Here are the stamps I used to fill in the frames and make the greeting:

Cheers to candy corn all things sweet!  Thanks for stopping by...
Karin


Related Posts with Thumbnails