Welcome!

My name, Karin, was pretty common when I was growing up...just not the spelling. Unless you are of German heritage like I am. So, I have spent my entire life answering the question, "What is your name"?... With, "Karin...with an "i"! Who knew it would come in handy all these years later when I went to name my blog.
Showing posts with label Friendship. Show all posts

Tuesday, October 3, 2023

Friendsgiving

 Hi Everyone,

I was organized enough one year to do a Friendsgiving event in October.  It was fantastic!  Everyone brought something, everyone got along, and no one was dreading the holiday season tasks to come!  I cannot recommend this party idea enough :)

For this card today I masked off a diagonal section of the card stock and sponged on some fall leaf colors.  Specifically, yellow, orange and red.  I used the Open Leaf stamp and added those on top of the strip. 


I simply stamped the Happy Friendsgiving on the bottom and colored it up.  I left off any gems or sequins to make it an easy to mail invite. 

Thanks for stopping by the blog today!
Karin


Tuesday, August 9, 2022

Cheerful Smiles

Hi Everyone,

My card today is generic, one of those cards that you can you use as a birthday, friendship or thinking of you cards.  In my opinion, you can never have enough of these in your card stash.

While I know Dogwoods don't come in these colors, it's my favorite flower stamp from the DRS Designs store, and I thought it would work for a background colored up in these fresh, happy colors. 


I added a die cut sentiment from the Cheerful Smiles Get Well Greeting which was embellished with a piece of ribbon.   

The yellows and oranges are making me think about the next season....GAH! I'm not ready to say goodbye to summer, so I'm quickly squashing that thought. 

Enjoy the summer as long as you can folks!

Have a good one!
Karin 


Tuesday, June 16, 2020

Tough Times


I've been enjoying stamping with the new images and greeting stamps that DRS Designs has recently released.  I made two cards using the same sentiment.  

Here I stamped and die cut Guide Dog Assisted Woman and paired that with the Tough Times Don't Last Greeting.  Using the colors from the image I made the backgrounds by stamping half with the Splatter Background stamp and half with the Argyle Background, filling it in with the matching Argyle Diamond.  I covered up the seam with a piece of printed ribbon and added a photo corner punch up top.


Here I made a quick and easy card using the same sentiment.  My mother-in-law broke her hip, and she has been one tough cookie during her recovery process, so this was made with her in mind.  I used a wet paintbrush and washed on some pink, yellow and blue ink.  One it was dry, I stamped and heat embossed Josephine the Bold right on top and only gave her some "lipstick".  


To make it a little girlie, I added some pink gems to the corners. I love how perfect the image and sentiment are together...Just the ticket for a little light hearted inspiration!

If there ever was a perfect sentiment for these times, I'd say this is it!

Pop on over to DRS Designs to get one too...

Sending you and yours stamping hugs!
Karin


Tuesday, April 28, 2020

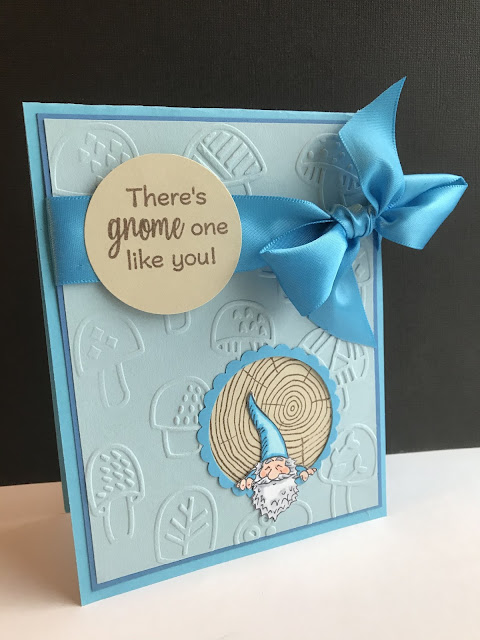
Gnome One Like You

Hi Everyone,

How about a couple of cards featuring the adorable Peeking Gnome to brighten up the day?  I took inspiration for this card from this post here.  

I loved the way Julie used the Stone Wall and Gate and house in the background, so I decided to make my own scene, using the Mushroom House instead.  The sky and grass were sponged first, and then I went in and stamped the house and Mushroom Line Background.   

The fence and gnome were both fussy cut and attached, and there was enough room to fit the 
Gnome One Like You Greeting right in the die cut scene.  I attached it to an embossed mushroom background and left enough room at the bottom to add a die cut fence. (Die and embossing folder both by Darice.)


This one was super easy.  I used the same stamps and embossing folder, just adding the
 Tree Slice Woodgrain behind the little window I created for the gnome to peek out.  


Thank you for visiting today and here's hoping all is well in your little corner of the world!

Happy Stamping,
Karin


Tuesday, April 14, 2020

Fairy 2 Ways

Hi Everyone!

These magical little stamps in the form of fairies and gnomes sure have brightened my days at home. So much so, that I'm kind of inspired to maybe make a fairy garden outside, once things warm up around here.  

Both my cards feature the new Fairy with Globe stamp, but in I've chosen to show her in two different ways.

Here I stamped the backgrounds using the Large Original Plaid and the Dandelion Puff in purple and pink ink.  Both the fairy and Toadstool were stamped, colored and fussy cut before attaching them to the die cut circles.  I also added a bit of glitter glue to the globe before choosing the sentiment, which came from the Birthday Candle Burst.


I wanted to make a second fairy card, so I used the same stamps, but colored everything black, so she looks like she's in silhouette.  


I attached everything to a dry embossed panel (Darice) and used the 1 Lined Blessed Day for my greeting.  

If you haven't checked out the new stamps a DRS Designs, be sure to pop on over to the store!

Have a Blessed Day!
Karin 


Tuesday, April 7, 2020

Gnome

Hi Everyone!

I've been waiting for this day, the day I could give you a peek at some of the new stamps being released at DRS Designs.  AHHH! I'm so giddy and I know that you will be too.  The design team will be showing them off all week and then you will be able to order them yourself starting on April 11th.

I think my favorite of the release is the Peeking Gnome (994) because his little face is so sweet!

Using blue ink, a sponge and a scalloped circle punch, I created the background for this card.  I then used the Brick Wall stamp to create the wall and I attached it to the bottom of the panel.  The gnome was stamped, colored, fussy cut and attached.  


It looked a little plain, so I die cut some grass (Darice) and attached it on top of the brick wall. 

For the greeting, I used the new Gnome Smile Greeting (997) and the Mushroom Line Background (983), simply coloring it up, adding a few white dots with a gel pen to get that effect. 

Remember the release date is April 11th at the DRS Designs store!

Happy Stamping!
Karin


Tuesday, December 3, 2019

From Our House

Hi Everyone,

Well, the holidays are now in full swing, and the shorter window between Thanksgiving and Christmas has really got me hopping to get things done!

Here's my latest card offering in the form of an easel card.  I stamped and colored the
 Christmas Rooftops along the bottom and added some falling snow by stamping the 
Snow Background in light blue ink.  Since it's all about love this time of year, I stamped the
Christmas From Our House Greeting in a die cut heart and added a mat.


That led me to simply stamp the Large Script Merry Christmas inside and add a punched border, using some of the smaller snowflakes to help keep the card open. 


Hop on over to DRS Designs to see all of these stamps and much more!

Tis the season to be stamping!
Karin

Tuesday, November 19, 2019

We Thank You Lord

Hi Everyone,

I have one last fall card to share with you today.  Thanksgiving is next week...are you ready?  I've taken the bold step by ordering a complete heat & eat meal for the first time from a local grocer. There will only be 4 of us around the holiday table, so I thought I'd give myself a break this year, and not cook :)  I'm a little nervous, but I'm telling myself not to compare anything to the usual side dishes I make, that have been passed down to me from my mom.  BUT, I'm not going to lie... I'm really going to miss not eating the southern peach yam bake...sniff sniff… Oh well, there's always  Christmas dinner, right? 

For my card, I began by using the Thank You Lord Greeting and die cutting it.  My laziness for cooking has bled into my cardmaking, in that, I wanted to use the Woven Plaid to make a background, but not a bunch of different ink colors.  So, I chose to use an orange base and just some brown ink.  Two colors, but only one ink color required!  It looks like it would make a great Thanksgiving tablecloth to me. 


For my fall embellishments I stamped the Fall Leaf with Acorn three times and fussy cut them out, coloring them up with my Copic markers.  I only needed two leaves, but used all three of the little acorns, and a brad from my stash finished it off. 

All of these stamps can be found at DRS Designs...Happy Fall and Happy Thanksgiving one and all!

Karin


Tuesday, August 20, 2019

Fall Friends

Hi Everyone,

I have a fall friendship card that's full of autumn colors to share on the blog today.

I began making my background using brown ink and the Open Leaf stamp from DRS Designs.  Knowing that I wanted to add it to a yellow base, I stamped over the leaves using the Splatter Background stamp.  I did three stamping passes using 3 yellow and rust colored inks.


I die cut some sticker paper, covered that in brown glitter and glued it to the corner, adding a small gem to dot the i.


It seemed a little too plain for me, so I used the rock and roll technique (Ink up stamp using a light color, then roll the edges of the same stamp in a darker ink.) when stamping out a few 
Medium Silhouette Leaves.  I then fussy cut them and attached them to my card with some foam taped for added dimension.

Thanks for visiting!
Karin

Tuesday, July 16, 2019

Bathing Beauty

Hi Everyone,

I feel like summer is in full swing, with lots of heat and sunshine in my home town, so while I don't live near an ocean, I do live close to one of the Great Lakes.  If you've never seen one of the 5 Great Lakes, this is a word of encouragement to visit.  They're almost like an ocean; they're so, so big.  And bonus...There are beaches, but no sharks :)))   

This beauty could be visiting any sandy shore in her cute bathing costume, and I thought she would be perfect for a bright, summer card.  After coloring up and fussy cutting the Frog Sunbather, I attached her onto an embossed and matted frame and created the backgrounds.


I stamped the yellow paper using the 4 in 1 Seashells and 4 in 1 Ocean Designs.  On the pink strips, I chose to use the sunglasses from the 4 in 1 Fashion Accessories to create a design.  I finished it off by punching out the Summer Story Greeting and adding it in between the patterned strips.  

Wishing you sunshine and smiles!
Karin


Tuesday, July 9, 2019

Twins

Hi Everyone,

What's better than Leonard Pig flying a kite?  Why, two Leonards of course!  He was the perfect image for an easy breezy summertime card :)

I stamped him twice and then added a couple of extra kites from the 4 in 1 In the Sky stamp.  After die cutting the image, I added some string to the two other kites to make it look like they were being flown from outside the frame.  


An embossed background and some ribbon were attached to the card base and I chose the punny Missing You Pig Time Greeting to finish it off.

 Check out DRS Designs for all of these stamps and so much more!

Hoping your day is a easy and breezy as this card! 
Karin

Tuesday, June 4, 2019

Animal Friends

Hi Everyone,

I have a couple of animal themed cards to share with you today and both of them use some of the new stamps that have been recently released at DRS Designs.

On my first card the animals are accessorized for summer using the 4 in 1 Fashion Accessories.  I stamped and colored Jimbo and the Gang and then added the fussy cut sunglasses, hat and bow tie.  I attached it to a base that was stamped using the Silhouette Leaf Background and created a sentiment for it by combining a couple of greetings, Jungle Out There and Flakey Friends Winter Greeting.


While this new background stamp is named Camouflage Background, I couldn't help but see cows when I looked at it.  I'm not sure what that says about me, since I'm nowhere close to being a farm gal!  If you're of a certain age, think Ava Gabor's character on the TV show Green Acres, and that's me :)

Anyhow, I stamped the camouflage in black and created a cow using my owl punch, a die cut oval, and googly eyes.  I wasn't able to piece together a sentiment, so I created one. It took me awhile, I was working on the word moo, but it wasn't coming together for me. Then I switched to the word cow, so I hope the pun comes across as a form of " How are you?" :)


Be sure to click on over to the new releases page at DRS Designs for all of these stamps and much more!

Have a great day,
Karin

Tuesday, May 28, 2019

Missing You

Hi Everyone,

With Memorial Day behind us on the calender, it's the unofficial beginning of summer, so I have mini summer like scene on my card share today.  

Leonard, from the new Leonard Pig Flies a Kite stamp makes an appearance here.  I stamped multiple hot air balloons from the 4 in 1 In the Sky stamp to complete the little scene.  I embossed 1/2 of my background with kites, and added some die cut clouds to the blue half to mimic the sky.


For a sentiment, I stamped the new Missing You Pig Time inside one of the frames from the Wooden Frame Collection stamp, fussy cutting it and attaching as you see here. 

I needed to make a masculine graduation card, so I chose the Follow Your Dreams stamp for my main image, which I then colored, die cut and matted.  

Neutral colors are always more masculine to me, so I created the background using the Grad Hat Hooray and Splatter Background stamps in black and brown ink.


Before attaching the image, I added a strip of splatter stamped cardstock that was layered on to a punched border, and wrapped with some matching twine. 
 Again, twine more masculine than ribbon to me :)  And since the image has a sentiment right on it, I was able to call this card done!  

All of these stamps, and much more, can be found at DRS Designs!

Have a great day and thanks for stopping by!

Karin


Related Posts with Thumbnails