Welcome!

My name, Karin, was pretty common when I was growing up...just not the spelling. Unless you are of German heritage like I am. So, I have spent my entire life answering the question, "What is your name"?... With, "Karin...with an "i"! Who knew it would come in handy all these years later when I went to name my blog.

Tuesday, December 26, 2017

Love Bug

Hi Everyone,

Happy Boxing Day to those of you who are fortunate enough to enjoy this holiday!  I've always thought is should be and official thing here in the USA...If I ever run for President, it will be one of my platforms...lol! After hosting Christmas eve and dinner on Christmas day, I definitely need a day of rest and leftovers :)

So, how about a sweet little valentine to kick things off for the next big card making holiday?  Isn't this little lady just the cutest?! She was too adorable to just use as a colored image, I decided to feature her on a stamped background too.  After die cutting the Love Bug, I did a poor job coloring her up, so instead of starting over, I stamped her again, fussy cut her out and used some foam tape and created a dimensional and better version.  I even added a bit of glitter glue to her nose! 


The border was created by stamping the Scattered Hearts and this new Love Bug Hug Greeting is just the sweetest!  

Here's hoping your kicking back today, and if Santa didn't bring you any new stamps, you can get them for yourself right here!

Karin
Tuesday, December 19, 2017

Happy Holidays

Hi Everyone,

It's getting to be crunch time when it comes to the holiday handmade items, so my card share is on the simple side today.  I always figure that's ok since the stamps themselves are super cute :) Nothing wrong with letting them shine on their own, right?  


I stamped the blue background with the Easy Dot Background stamp and some white craft ink.  I know it's subtle in the photo, but it looks like a cute alternative than the usual snowflake background.   
I colored and fussy cut the Stretch the Round Button Snowman and layered him onto a die cut that I embossed.  That embossing folder had both dots and snowflakes, so it matched the stamped background.  


For the greeting I used the Small Happy Holidays stamp and my circle punches, along with a snowflake punch that I thought matched the embossed ones behind that frosty guy :)

Happy Holidays to You and Yours!
Karin


Tuesday, December 12, 2017

Noel

Hi Everyone,

I love the traditional red and green color combo for cards this time of year, don't you?  I always think those two colors together scream Christmas time is here :)

So, with that in mind I stamped and colored up a little winter scene using some of the winter village stamps.  I die cut and matted it, adding some glitter glue and the greeting right in the scene too.


The background paper was made using two different background stamps and red and green ink.  The line of background stamps here at DRS Designs make it so easy to make custom paper in a jiffy!  

To finish off the card, I added the word Noel to a strip of paper with a punched border.

Here is a list of stamps used for this make:


Stop by DRS Designs soon...There's a special on their stained glass stamps!
Happy Stamping!
Karin

Friday, December 8, 2017

Buddies

Hi Everyone,

Isn't this Wintertime Buddies stamp just super cheerful?  It's always been one of my favorites for making a friendly looking Christmas card :)

I colored it up and fussy cut it out, adding some glitter glue to the fur on Santa's clothes.  As I was waiting for that to dry, I die cut and dry embossed the large circle that was to hold the Santa and Snowman image. 

The background was stamped using the Snow Background stamp and I added a green panel that was dry embossed with holly.


The sentiment is the last line from the Heartache at Christmas stamp and the poinsettia embellishment was fussy cut from the recently released Poinsettia Vine Corner stamp.

It's beginning to look a lot like Christmas....Hope your holiday prep is going strong and thank you for taking time to peek in on us today :)

Have a great one!
Karin


Tuesday, December 5, 2017

Kitty Christmas

Hi Everyone,

DRS Designs recently released this cute Santa Puppy stamp, and while I've been making cards with my dog lovers friends in mind, I needed to represent for the cat lovers too!

I stamped the Cat Angel and then colored and fussy cut it out, snipping off the halo, wings, and cloud it was sitting on.  I then stamped that Santa Puppy and colored and fussy cut the hat, attaching it to the kitty, completing it with a squirt of glitter glue on the white fur.  


I stamped and embossed the background using the Interlocking Snow Background and then added a white panel that was dry embossed with snowflakes too.  I added a red border strip to match and attached everything to a white card base.  

The Doggone Christmas Greeting was stamped and cut into pieces, but I had to replace the dog portion of it with something cat related.  I chose to stamp the Pawsitively Birthday Greeting in red and then added all of the pieces at different angles for a touch of whimsy :)

Hope your day is Paws-itively wonderful too!
Karin

Tuesday, November 28, 2017

Christmas Puppies

Hi Everyone,

One of my newer favorite Thanksgiving traditions is to watch the National Dog show.  It comes on after the parade and I just love watching those cute dogs prance across the TV.  So inspired by that,  I decided to stamp and color up that new Santa Puppy stamp for my card share today.

I stamped him 3 times and colored the center one a different color, then adding a punched border.  After setting that aside, I stamped the card base using Versamark and the Large Original Plaid background stamp, just to give a subtle texture to it.


For the Doggone Christmas Greeting was stamped, colored and die cut and attached to the back of the dog panel, before I attached everything to the card base.  The snowflake was one of those diecut bits and bobs that is perpetually hanging around my stamping spot, just waiting to be chosen for the perfect spot on a card.  And I guess this was it :)  The last thing I did was round my bottom two corners to match the scalloped border. 

Thanks so much for peeking in on the blog today! Have a good one :)

Karin


Tuesday, November 21, 2017

Peace

Hi Everyone,

Today's card share is based on my personal color preference when buying my poinsettias for the Christmas season. I always lean towards the pink, maroon and cream ones, rather than the bright red. It's all about trying to match my home decor :)

I started with the Poinsettia Vine Corner stamp from DRS Designs and made a little frame by stamping it twice.  Inside I used the sentiment portion from the Three Wisemen Peace stamp and then colored it in using my Copic markers.  I die cut it using the curved rectangle dies and added a bit of sponging and glitter to the berries.


I embossed the background with large snowflakes and wrapped a ribbon around it to mimic a gift.  I adhered the sentiment to the center and finished it with a die cut frame and flowers with gem centers. 

I don't think I could name a better gift to give our world, than peace on earth!  It's my heart's desire for sure.  

May there be peace in your little corner of the world today :)

Karin

Friday, November 17, 2017

Peace and Joy

Hi Everyone,

Last week I attended an art exhibition at the Cleveland Museum of Art entitled the Jazz Age.  It was a wonderful mix of art, furniture, clothing and jewelry from the Art Deco era, and one of the things that made and impression on me was a tea set that was silver and embellished with ivory.  The clean lines are what inspired this first card.

It's a simple cream and black color combo using and embossing folder and an edge punch.   


The Deco Peace and Joy Christmas Greeting was stamped, die cut and matted on a piece of paper coated in a black and gold glitter.


I decided to use the Peace and Joy portion of the same greeting for the sentiment on this second card.  


I stamped and colored up the Triple Hanging Christmas Ornaments and attached them to a background made using the Large Fillgree Snowflake.

Be sure to stop by DRS Designs to check out all the new Holiday stamps.


Tuesday, November 14, 2017

Thinking of you at Christmas

Hi Everyone,

"Remember the love at this time of year;
 Keep in your hart the one you hold dear.
 Remember the joy of holidays past; 
The heartache you feel, won't always last."

I think the above verse on this newly released Heartache at Christmas stamp is so touching.  It's difficult to figure out what type of card to send someone who's hurting from a loss at this time of year.  Holly jolly festive themes just don't seem to cut it, so I was thrilled to be able to make something so heartfelt.


Snowflakes were the theme I chose, so the background was made using the Medium Filigree Snowflake and the Snow Background in red and blue ink.  I added a red diagonal strip that was embossed in white, using those same snowflakes.  For embellishments, I attached some red lace, a few punched snowflakes and a gem

As we ease into the busy time of year, I 'm wishing you peace and happiness!

Karin


Tuesday, November 7, 2017

Nature Santa

Hi Everyone,

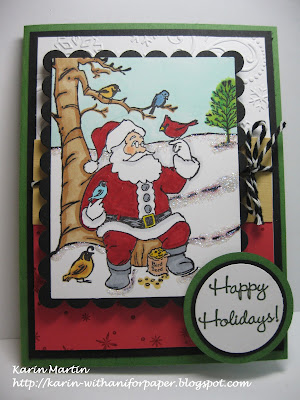
 I'm sharing a sneak peek of this new Christmas stamp soon to be released at DRS Designs.  It's an adorable scene with a cute Santa feeding our feathered friends :)  It reminds me of one of my favorite Christmas ornaments.  I wish I had a photo to share, but it's currently still packed away. He's a St. Nick type Santa with a cardinal perched on his hand, just like this!

I colored this with my Copic markers and die cut it using my Spellbinders dies.  I also used a touch of glitter glue to accent the snow.  Taking inspiration from the winter scene, I used those colors to choose my card base and background papers. 


I embossed the top portion with a Darice snowflake embossing folder and stamped the bottom portion with snowflakes too.  I used my circle punches for my sentiment and added a piece of twine to finish it off.

Here is the link to the stamps I used and the new holiday stamps will all be available on November 4th!

Santa with Birds (351P)

Have a super day!
Karin


Tuesday, October 31, 2017

Santa Pup & Winter Scene

Hi Everyone,

Happy Halloween!  By the looks of my card today, you probably think that I'm confused about my holidays...lol. Nope!  I'm just excited to be sharing peeks at some of the new holiday stamps being released at DRS Designs.

This adorable Santa Puppy (408F) is all dressed up for Christmas, (or for Halloween!)  and I paired it with the new Doggone Christmas Greeting (410D).  Instead of making my backgrounds using holiday stamps, I inked up the Dog Print Background and dry embossed the bottom portion with paw prints as well. I finished it off with a small metal embellishment.


For my second card, I made a little wintry scene.  I embossed the background using a snowflake embossing folder and white and red papers. See those rocks along the edge of the pond?  That's a new stamp addition to the group of village stamps, here at DRS Designs and it's just perfect. All I did was stamp, die cut and color up my scene, adding some glitter glue for snow at the end :)  


Here's where you can find the stamps I used for this card:

Village Rocks/Pond's Edge (356F)

Have you started on your holiday cards yet?  We have tons of inspiration in the card gallery at DRS Designs!

Have a great day!
Karin


Tuesday, October 24, 2017

Happy Thanksgiving to You

Hi Everyone,

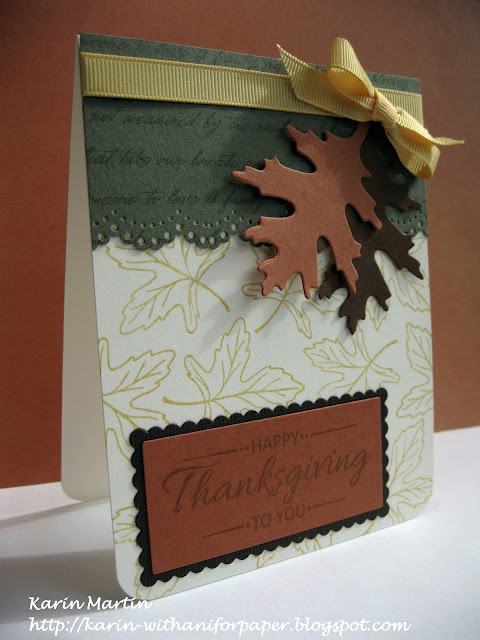
I'm still working on making some Thanksgiving cards and this one was pretty simple to stamp.  Looking at the card, I think I was influenced by the fact that our leaves haven't been brightly colored this year, and there are still a ton of green leaves yet to turn.  I believe the warm weather is the cause, and it's because of that, I'm not complaining :)

I began by stamping the card base with the Open Leaf  from DRS Designs in a yellow-gold ink.  Originally when I started, this was going to be one layer, and I stamped the Deco Happy Thanksgiving to You along the bottom, but as it sometimes happens, I ended up with a smear.  I wasn't going to be deterred, and stamped it again using my dies to make the layered sentiment that covers up the boo boo.  You know what they say?  There are no accidents, only a chance for embellishment!    


I then made a border for the top using the Script Font Background stamp and a border punch, finishing it with a couple of die cut leaves and some ribbon.  

Hope you're having a happy day!
Karin


Tuesday, October 17, 2017

Two Cards

Hi Everyone,

The first time I saw this Pumpkin Spice Everything Nice greeting from DRS Designs, I knew I wanted to make a coffee themed card.  There was just one problem...I don't own a coffee cup die!  Many of my design team mates made darling cards with this idea, and I knew if I thought hard enough, I could make one too.  I just needed to be a little creative. I pulled out my idea binder, and I came across some punch art using the old tag punch from Stampin Up.  I simply added some handles using a couple of circle punches, and stamped them both using my Splatter Background stamp.  

I had already decided to make a friendship card, so I attached the mugs to an embossed hello background, and added a heart in between the two mugs.   


I made a strip of patterned paper using the Medium Silhouette Leaf stamp and the Silhouette Branch Background stamp.  I added a border and attached the greeting with dimensional foam tape.

Since October is National Breast Cancer Awareness month, I thought I would post this too.  I used the Cancer Is stamp to make a card to cheer on a friend who is fighting this disease.   


I added the Support Ribbon on top of the greeting and used basically the same layout as the above card.  

Get yer checkups Ladies, and then come home and stamp something!

Have a great day!
Karin


Tuesday, October 10, 2017

Happy Thanksgiving

Hi Everyone,

I'm excited to be hosting Thanksgiving dinner for the first time in a long while, and I've been trying out all kinds of card designs for my invitations.  For this one, I inked up the new Filigree Pumpkin stamp and embossed it with brown iridescent embossing powder.  I then used my sponges and ink to add some color and fussy cut it out.  I decided I like the design on the pumpkin so much, that I used it to create the patterned paper for the background. It's behind the strip of embossed leaves, ribbon and the Happy Thanksgiving Greeting. 


 I tried to mimic the the colors on the pumpkin by adding them on to the greeting, sponging yellow ink in the center and orange around the edge. 

Here is a close up of the embossing on the pumpkin and the the matching background paper.


All of these stamps and more can be found at DRS Designs...Just click here!

Thanks for stopping by!
Karin

Tuesday, October 3, 2017

Fall Cards

Hi Everyone,

I have a couple of fall cards to share with you today, both showing off my love of making my own backgrounds.  It's so satisfying to be able to customize anything thing that I want to make, and DRS Designs has a whole range of stamps for all our crafty needs :)

I began by making a leaf background using the Medium Silhouette Leaf stamp in a range of autumnal shades.  I also had the Silhouette Branch Background stamp on my table from the card I made last week, so I stamped a strip of coordinating colors and added a matching ribbon before adhering it to my card.  

I stamped and die cut the new Deco Happy Thanksgiving to You Greeting and attached that with some dimensional tape, embellishing it with the Classic Turkey stamp that was colored and fussy cut as well. 


It was easy to keep going, so I used the same Leaf again, making just a strip of patterned paper this time.  I added a punched border and placed that on an embossed background of fall themed words.  


And since my dies were handy too, I used the same for my stamped Give Thanks Greeting.  

Happy October!


Related Posts with Thumbnails