Welcome!

My name, Karin, was pretty common when I was growing up...just not the spelling. Unless you are of German heritage like I am. So, I have spent my entire life answering the question, "What is your name"?... With, "Karin...with an "i"! Who knew it would come in handy all these years later when I went to name my blog.

Tuesday, December 28, 2021

Cheers!


Hi Everyone,

Since were staring 2022 right in the face, I'm celebrating the new year with this great new card sentiment, Best Year Cheers Greeting!  I love the fresh hope a new year brings. Whether you celebrate with adult beverages or sparkling water, whether you say cheers, prost, or salud, like the greeting says, Let's make the coming year the best!

For the first card I tried to go retro, using a martini embossing folder and some avocado colored flock along the side.  


Here I chose an embossing folder that has clocks, to play off of the idea of the countdown that happens on New Year's Eve. I added a fussy cut glass from the Pour Me Bottle and Glass stamp, and a recycled embellishment from a Christmas card I received. 


Cheers to 2022 and as much stamping as your heart desires!

Happy New Year!
Karin


Tuesday, December 21, 2021

Winter cards


Hi Everyone,


Do you know someone with a winter birthday?  Well, I have just the stamp for you!


Here is the new Ice Day Birthday Greeting that I paired up with some embossed mittens, to match up with the gloved portion of the sentiment.  After adding some gems, I need another embellishment to balance out the card, so I used a reverse image stamp and fussy cut a couple of mittens from the Raised Mittens Skip Winter Greeting.


I already needed some thank you cards for holiday gifts I've received, so out came a favorite stamp, the Blizzard of Thanks Greeting!  Just add any manner of snowflakes, and you have a cute card :)  Here I used Interlocking Snow Background and Simply Snowman.


Stop on over at DRS Designs to take advantage of the sale happening right now!


Happy Stamping!
Karin


Tuesday, December 14, 2021

Happy Valentine's Day


Hi Everyone,

Is it too early for a valentine card?  Not when I've got some new stamps to preview.  Be sure to pop on over to the DRS Designs store to see all of the new stamps beginning December 15th! 


Until then, this card features the new Candy Heart Background (1065G) stamp, which I stamped onto pink paper, coloring in the tiny hearts.  I added a die cut heart banner along with the new Double Line Happy Valentine's Day (1067G) for the greeting. 


All that was left was to add Leonard the Cupig, because he is just beyond adorable! I simply fussy cut him after he was colored up and I attached him with some dimensional tape.


DRS Designs is running a sale right now, so stop over and order what you need to get stamping!


Happy Holidays!
Karin

Tuesday, December 7, 2021

Merriest Wishes

  Hi Everyone,


I feel like I'm finally into the swing of things for this holiday season!  My house is decorated for Christmas, and we hosted friends for games and snacks on Saturday night.  During all this, holiday music has been playing in the background, and I'm sure the song Silver Bells had to have come up at least once in the rotation.


I stamped, colored and die cut the Bells Holly and Bow image for my card, and tried to color them to appear silver.  Taking inspiration from the colored image, I embossed a die cut piece of yellow cardstock and layered it onto a background that was stamped, and silver embossed using the Interlocking Snow Background.


For the greeting, I used the new Merriest Wishes Greeting, die cutting it and embellishing it with a bit


 of sponging. To finish it off, I added a few punched holly leaves and berry gems. 


If you're looking for a few stamping goodies for yourself, DRS Designs is running a customer appreciation sale just for you!  


Happy Holidays!
Karin


Tuesday, November 30, 2021

Jesus is the Reason


Hi Everyone,

I hope you had a great Thanksgiving last week, and that you're ready to get into the swing of things for Christmas!

Starting off the post with with the new Jesus is the Reason Greeting, which I stamped, die cut and embellished the star using a silver gel pen.  I paired it up with that sweet little country looking church from the group of Christmas Village stamps.  Also die cut, colored and embellished with a bit of glitter glue on the snow. 

I attached it to a dry embossed background and added a few snowflakes for embellishment.


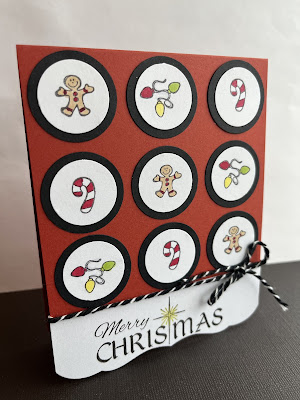
Remember then new Ugly Christmas Sweater Designer stamp that was in the recently released group of stamps?  Well, these tiny holiday images are from that set.  I used them without the sweater image along with my punches to create this simple card.  I stamped the new Christmas Star Merry Christmas and attached it to the bottom of the card, and then cut off the bottom with a scalloped die.  


A bit of embellishment using a gold gel pen on the sentiment along with some twine finished off the card.  


Thanks for stopping by!
Karin

Tuesday, November 23, 2021

Season of Peace


Hi Everyone,

I love this new Small Season of Peace Greeting! To me, it just begged to be paired up with a snowy, winter scene.  

I stamped, die cut and added some blue chalk around the edges of the Winter Trees, while spray adhesive and some glitter completed the look for that image.  I attached it to a background stamped using the Snow Background and added a dry embossed snowflake strip behind my die cut greeting.


I used my trusty bird punch to make a dove to complete the card. 

I used the Small Season of Peace as the sentiment for my easy card as well.  It's been awhile since I bought myself a new holiday die, and I thought this one from Momenta would do the trick when I needed to make many cards in a hurry.  Any great sentiment from the DRS Designs store would work to complete the card!


Thanks for visiting today! 
Karin


Tuesday, November 16, 2021

Plaid Tree


Hi Everyone,


I decided to feature the recently released Plaid Fir Tree on my card today, and I began by stamping and fussy cutting 3 trees.  Once they were cut, I turned them over and stamped them on the opposite side, and then glued them together by adding glue down the center of the trees.  

I attached my three dimensional tree to a die cut and plaid embossed panel, which was attached to a background made using the Woven Plaid Background stamp. 

A die cut border embellished with enamel dots was added at the bottom and I finished the card with the new Tis the Season Greeting.


Here is a close up of the tree...


Thanks for visiting and be sure to check out all of the newest holiday stamps over at the DRS Designs store!

Karin

Tuesday, November 9, 2021

Season of Thanks

 Hi Everyone,


One of the newer fall stamps from DRS Designs is this Large Happy Fall Y'all greeting, and I matched it up with one of my favorite fall images, Bountiful Basket.  My husband says that everyone makes fall about pumpkins and pumpkin spice, but apples are what he thinks of when it comes to fall. This lovely image has both!

The image was colored and die cut, the sentiment was made using punches and the Medium Silhouette Leaf stamp, and both were layered onto an embossed leaf background of bright fall colors.


I added a few die cut leaves in those same colors to complete the look.


Here I made a Z Fold card using the Season of Thanks Oval stamp, and the Medium Silhouette Leaf which was stamped using a rainbow stamp pad. (Kaleidacolor)  Since the multicolored ink did most of the work, all I did was enhance the swirly leaf using some glitter glue.


Here is the inside panel that I stamped using the Open Leaf stamp.  I figured this would make it easy to write a personal greeting on top.


Thanks for visiting and be sure to pop on over to see all of the new holiday stamps from DRS Designs right here!

Have a great day!
Karin

Tuesday, November 2, 2021

Ugly Christmas Sweater


Hi Everyone,

DRS Designs has released lots of great holiday stamps this past weekend.  If you are behind in your holiday stamping,  (Me, me! I'm raising my hand along with you...) the stamps on my first card are sure to jump start your mojo. 


This one features Ugly Christmas Sweater Designer.  It's a group of stamps that includes a sweater, some stitching lines along with 3 tiny images for the sweater!  I mean, it was the first thing I wanted to ink up when I opened my new stamps, because it looked like so much fun.  I'm not sure what this says about me, but I would wear this blue and red candy cane sweater unironically.  It's sooo cute!  Anyway, you can make yours any color and set comes with a string of lights and a gingerbread man too.


Also available is a matching Ugly Christmas Sweater Greeting, which was a must have to go with all the sweaters I'll be making.


Everything was layered onto a background made by sponging over a die cut snowflake, along with a snowflake border made using Interlocking Snow Background stamp.


A couple of punched snowflakes embellished with gems finished it off.

This card was a quick masculine birthday card I made for a friend.  No frills,  just some good old stamping, some Stickles to enhance the beer foam, and a few metal brads :)


The stamps used here are as follows:


Don't move on until you've clicked on over to see all the new stamps at DRS Designs!  


It's almost the holiday season, so don't be caught unprepared :)


Have a great day!

Karin 

Tuesday, October 26, 2021

Blessings

Hi Everyone,

One of my favorite fall stamps from the DRS Designs catalog is Framed Thanksgiving Greetings. I just love the images in those frames!  So I decided to pair them up with the new Blessing For You Thanksgiving Greeting.

I stamped, colored and fussy cut those little pictures, and attached them onto an embossed background with autumn words.


I stamped the greeting, die cut it and added some yellow and green inking.  To give the greeting a space to land, I added a strip of scrap orange paper embellished with a striped ribbon. 

Thanks for visiting the blog today! 
Karin


Tuesday, October 19, 2021

Thanksgiving Blessings


Hi Everyone,

I have a fall themed card, that was made into a Thanksgiving card by using a holiday greeting. Sometimes I just make the card, and wait until I need it for a specific occasion and then add a greeting.  

I began by stamping the Simply Pumpkin, masking it and then stamping the Wagon Wheel.  This made it look like the pumpkin was in front.  I colored it up and attached a punched border, along with a bit of ric rac.  I stamped the top portion of the base using the Open Leaf stamp and then attached the image on top.


The Blessings for You Thanksgiving Greeting was die cut and matted, and I stamped another leaf on top.

Thanks for stopping by!

Karin

Tuesday, October 12, 2021

Autumn & Birthdays

Hi Everyone,

Even though it's so warm outside and doesn't feel like October here, I'm celebrating fall with my card share today.

I have a love of hot drinks, so I made a fall themed coffee cup that I paired with a cheerful greeting.

The cup and die cut embellishments were layered onto a woven, scarf themed background.


Here are the stamps I used:


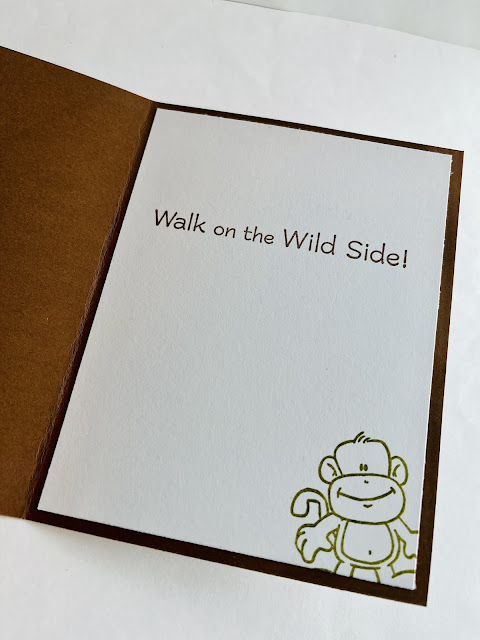
I needed a quick birthday card, so I took inspiration from this card and simply used monkeys instead of cats, along with a fun greeting that I split in half.


Here inside is the rest of the greeting and another monkey :)


Here are those stamps:

Michelle Monkey

Walk on the Wild Side Birthday Greeting


Want more stamps and project ideas?  Visit the DRS Designs store!

Thanks for stopping by! 

Karin


Tuesday, October 5, 2021

Oktoberfest and Thanksgiving

  Hi Everyone,


My first card is a nod to my German heritage!  I'm a first generation American and once September rolls around, all the clubs here in the Cleveland area start with their Oktoberfest celebrations.  I'm not even joking when I say my dad, LITERALLY goes to ALL of them.  Me?  I've never been to one.  Even one time.  Anyway, I'm celebrating with my card today!


The background was made to look like the German flag and I stamped a row of Small Beer Mugs, doing a bit of masking to make the line, and the new Brew-tiful Day Greeting was a perfect completion to the card.


Here I paired the new Tipsy Turkey image and the Get Basted Greeting.  I can't help but think of the college students that all come home for Thanksgiving, and gather for a reunion night on that Wednesday with their friends.


And since I had the Small Beer Mug stamp still on my table from the last card, I added it for embellishment here too. 


Cheers to you and a happy autumn season and whatever holidays you celebrate!


Cheers!
Karin


Tuesday, September 28, 2021

Season of Thanks

 Hi Everyone,


Today the oval on my card features one of the newest stamps, Season of Thanks Oval, here from DRS Designs. It's so perfect for this time of year, so I stamped and heat embossed it, adding some autumnal colors to enhance the swirling leaf. 

The background was made by inking up a leaf embossing folder with gold ink and using that same ink to stamp the Open leaf on the orange portion of the paper.

I covered up the seam between the two with a ribbon and attached the sentiment on top.


Here is a close up of the inked leaves and embossing.


I totally took my anticipation of the changing leaves and channeled that into the colors on my card....I hope you're enjoying card making this time of year too.  

Be sure to stop by DRS Designs for more great stamps!

Thanks for visiting,
Karin


Tuesday, September 21, 2021

Blessings


Hi Everyone,

Some great new seasonal stamps have been released over at the DRS Designs store, and they're perfect for all your Autumn and Thanksgiving stamping and crafting!

Here I'm using the newly released Blessings for You on Thanksgiving Greeting (807F).  I stamped and die cut it, adding some layers and ink to highlight it.  The Woodgrain Background was stamped and heat embossed using some powder that has a sheen to it.  I wanted to give the card a shabby chic look, so I wrapped that portion with a burlap and lace ribbon.


Before attaching the sentiment, I added some die cut leaves in in fall colors that were enhanced by a bit of inking around the edges.  

Are you in the mood for fall?  Looking to get some new products?  DRS Designs is where it's at!

Happy stamping!
Karin


Tuesday, September 14, 2021

Halloween Gnome


Hi Everyone,

This past weekend we marked 20 years since that terrible day on 9/11.  Reliving it in my own thoughts, watching coverage on tv and talking with loved ones, I really couldn't do scary or spooky when it came to my crafting time, so I went cheerful for my Halloween theme instead.  


I knew a gnome would lift my spirits, so after stamping and coloring the Peculiar Pumpkin Patch, I decided to add the Peeking Gnome for fun.  He was fussy cut and made more festive by swapping out his hat for the one from the Witch Gnome.


The card base is a simple orange and yellow, with a die cut pumpkin vine glued on top.  For the sentiment, I stamped the Halloween Gnome Greeting and die cut it in the shape of a pumpkin and added it to the corner of the vine.  A few gems we added for design balance. 

Do you like this gnome themed card?  Be sure to stop by DRS Designs to get your stamps today!

Thanks for stopping by!
Karin

Tuesday, September 7, 2021

Halloween Cards


Hi Everyone,

I'm still at work on some more Halloween cards this week, so here are a couple of my recent creations.

Even though I embellished this with some sequins, I would consider this a CAS card...at least when it comes to what I usually make.  I stamped the Silhouette Witch Cauldron on a lavender base and then added the greeting. 

I stamped the Brewing Halloween Greeting in black and added the Bubbling Beaker in lavender to keep the monochromatic look.  I attached it with some dimensional foam tape and added a die cut spider.


This card was made by stamping and heat embossing the new Beware Crow stamp.  I ended up fussy cutting it for a whole other card design. Alas, it did not go as planned, so I ended up gluing it to some oval die cuts, for use on this card here.


The background was made using the Starry Background and the Spooky Eyes Background in grey and orange inks.  I wrapped it with some black lace and finished it with a die cut bat for embellishment. 


Thanks for stopping by!


Karin

Tuesday, August 31, 2021

Happy Halloween


Hi Everyone,

With September starting tomorrow, fall will be here before we know it, and in my house, Halloween is the kick off to the holiday season.  I've extoled my love of candy corn previously here on the blog, and next to candy, stamping is my another of my favorite things for the holidays.  

This first monochromatic card features the new Halloween Crow/Witch Frame, which was stamped, heat embossed and die cut using a rectangle die.  I layered it all up using dimensional foam tape and attached it to the card base stamped using the Accent Bats.  A simple strip of black glitter finished it off.  


Since my rectangle dies were still out on my craft table, I used them again on my second card.  I decided to feature the Witch Books and Hat, so I stamped, colored and fussy cut it out.  I dry embossed the first rectangle layer, and stamped the second using the Spooky Eyes.  The background was stamped using the Empty Spider Web and my drippy goo punch has to make and appearance, at least once a season.


I added two purple strips of glitter and for the sentiment, I used the beginning portion of the Witches Brew Halloween Greeting, to match the whole magic spell theme of the card. 

Be sure to check out all the Halloween goodies at DRS Designs!

Karin


Tuesday, August 24, 2021

Witch Gnomes


Hi Everyone,

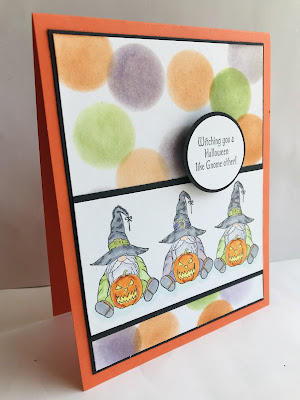
I'm in love with this adorable Halloween Witch Gnome!  Isn't he cute?! This stamp is one of the new stamps just released and it goes perfectly with the Halloween Gnome Greeting too.

Too cute to stamp just once, I made him a triplet and colored them up.  For the background, I had a scrap of paper that had a hole punched out, so I used that as a stencil and sponged on some Halloween colors.


To finish it off, I punched out the greeting with the same size circle punch, and then attached it with dimensional foam tape.

I wasn't done stamping gnomes, so here I colored and fussy cut one out.  I wanted to use the new Enjoy the Ride Greeting, so I placed the little Witch Gnome on a Broom and attached it to a Starry Background, for his magical ride.


Lastly, I added a die cut bat for embellishment! Ta-da :)

There are so many wonderful Halloween stamps to be found in the online store...Be sure to check out all the spooky fun!

Thanks for stopping by,

Karin

Tuesday, August 17, 2021

Drop in for a Spell


Hi Everyone,


I could not be more excited to craft with these new Halloween stamps that are being released at DRS Designs on the 18th of this month.  Give me all things fall, because I am HERE for it! The grocery store is setting up its candy aisle, and I want it all.  Frankly, one year they were setting up after July 4th, (not THAT is crazy) so I'm totally not mad about a mid August display this year.


Anyway, I knew I wanted to ink up the Silhouette Witch Cauldron (716K) first, so I began by inking up my background in Halloween colors, and then stamping over it using the Splatter Background stamp.  I then stamped and heat embossed the witch on top.


I added the Drop In For A Spell Greeting at the top and the Magic Potion Shelf at the bottom.  Those were also heat embossed and fussy cut before attaching them to the base. 


I attached the panel to a card base stamped using the Empty Spider Web stamp and added some swirling gems for the heat coming off the cauldron.  


Be sure to keep tabs on the DRS Designs blog all week.  We're thrilled to be showing you all the newest stamps coming out tomorrow!


Stamping hugs :)
Karin


Tuesday, August 10, 2021

A Little Wish

Hi Everyone,


As I type this post, the weather forecast for today is a steamy 92 degrees in these here parts.  So I thought I would take that opportunity to chill out and make another cold weather card.  Are you keeping count?  That's two, People!  I've made two holiday cards! I'm celebrating any small victory these days :)


It's not too fussy, flat, and therefore, easy to mail.  I stamped, colored and fussy cut the Potted Christmas Tree.  I added some glitter glue to the ornaments and set it aside to dry, before adding it to the card.  I chose to pair it with the Tree Shaped Christmas Greeting, simply because of the obvious shape. 


I was going to leave the card panel as just the tree and greeting, but I struggle to keep things clean and simple, so I added the double sided tape covered in glitter on each side to complete the look. 


This second handmade Christmas card is what is making me happy today...


Wishing you stamping joy too!

Karin

Tuesday, August 3, 2021

Friendly Note

  Hi Everyone,

I was inspired by my cards in this post, to try stamping by masking off a portion of the main panel.  The last time, I masked off a section, and inked and stamped just between the two pieces of tape.  Here I used one piece of washi tape, and stamped my leaves and florals on either side.  I then removed the tape, and stamped  Friendly Note Greeting in the blank space, embellishing it with a couple of gems.


The stamps I used are as follows:

Silhouette Branch (stamped in green)

Puff Circle (stamped in pink)

Silhouette Leaf Branch (stamped in teal)

Thanks for stopping by!

Karin


Tuesday, July 27, 2021

Flakey Friends


Hi Everyone,

I'm celebrating Christmas in July with this simple holiday card.  Goodness, do I like making Christmas cards when I'm not strangled by a long list of recipient names, and it's not mid December...lol!  Every year I vow to make a head start, and I guess this is my start this year.  Let's see if I can keep it going!

I began by stamping, coloring and fussy cutting Stretch the Round Button Snowman, along with the Flakey Friends Winter Greeting. 

The background was made by stamping Interlocking Snow and Easy Dot Background in different purple inks to match the snowman, and I simply added a punched border and a die cut snowflake.  Easy Peasy!


Have you made any holiday cards this month?  If you need some inspiration, pop on over to DRS Designs and have a look around!

Thanks for stopping by & stay cool!

Karin


Tuesday, July 20, 2021

Popsicles


Hi Everyone,

Is there anything more summer like than popsicles?  I think not!  So I made a card celebrating that sweet summer treat.

I don't have a popsicle die, so I began by die cutting out rectangles and rounding off the top corners.  I used my word window punch for the two "indentations" on the treats and inked up the edges of all the papers for a bit of dimension, finally attaching some real sticks to complete them.


I layered them all onto an embossed citrus background, since in my mind the flavors were orange, lime and lemon. 

For the greeting, I chose the 1 Line So Sweet Greeting.

And YOU"RE so sweet for stopping by the blog today! 

Have a great one!
Karin


Tuesday, July 13, 2021

Drink in Your Hand


Hi Everyone,

Since we're in the thick of summertime, I used the new Toes in the Sand Birthday Greeting for today's card. Even though it has a beach vibe, I decided to focus on the "drink in your hand" portion of it.

I masked off the globe from the Fairy with a Globe stamp, and paired it up with the Wine Glass image from the Pour Me Bottle and Glass stamp, and also sat her on a Toadstool as well. I colored it up and added some glitter glue to her wings.


The background was dry embossed and attached a punched border that was stamped using the Easy Dot Background.  I finished off the card with some flowers and enamel dots. 

Thanks for visiting! 

Karin


Tuesday, July 6, 2021

Happy Retirement

                                                                      Hi Everyone,


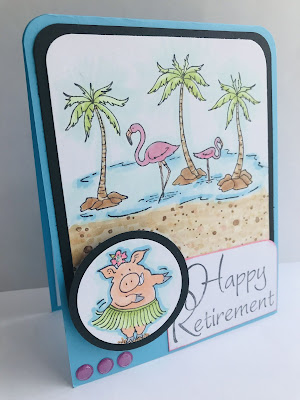
I made this card with my cousin in mind.  Her last day of work was last Friday, and now she is free to do as she pleases.  Woot woot! 


I'm not sure if they have flamingos in Hawaii, or if they dance the hula in other tropical places, so I've probably mixed up my warm weather images for this card.  Whatever.  I say it celebrates all her travel to come ;)


I stamped the Flamingo Palm Tree Scene for the background and then added the Hula Pig and Brush Happy Retirement Greeting to the front. 


A few enamel dots and a dab of glitter on her flower finished it off.


Inside I stamped the Rest Best of Life Birthday Greeting, because it seemed so perfect for the occasion.  And who can resist Hula Pig?  She had to come along inside too!


Thanks for stopping by and I hope you're dancing your way through summer!


Hugs,
Karin

Tuesday, June 29, 2021

Easy Summer Cards

  Hi Everyone,


Last week I went on a getaway with my husband to an inn, down in the heart of Amish country in Ohio.  It was our first time away since, what I call, "the before times".  While it wasn't completely normal due to them being short staffed, and my husband working from his lap top, it was still a pleasant escape from suburban life.   I was scrambling a bit before we left home, so I made these two quick cards with a summer theme.


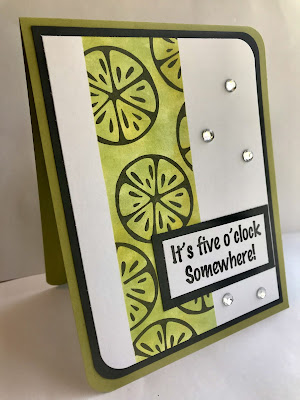
I masked off this vertical strip and sponged lol on various greens and yellow ink to achieve this color. Before removing the masking, I stamped the Citrus Slice all along the colored portion, and then added the It's Five O'clock Somewhere Greeting adding a few gems for embellishment.


It was so quick and easy I made a second card using the same technique, just different stamps and enamel dots. 


The stamps for the above card are as follows:


Summer Story Greeting

4 in 1 Seashells


While I wasn't at the beach, here's a peek at the lovely scenery where we stayed...


That's me outside the entrance.  These rooms are called the "honeycombs" and they're built into the side of a hill.  They all have stone patios with bird feeders outside and you can even hear the baaaah of the sheep in the distance.  Not a big deal to some, but slightly magical to this suburban/city gal :) 


Thanks for stopping by, and be sure to visit DRS Designs for all your summer stamping needs!
Karin


Tuesday, June 22, 2021

Summer Time

Hi Everyone,

It's officially summer and in my opinion, margaritas are the ultimate adult summer beverage. The lime, the icy bits...the SALT! They're even good minus the tequila.  Just add some simple syrup, a fresh squeezed orange to the lime juice, (and a splash of fizzy water for some pizazz) and you're in business. Mmmmmm...I think I should have titled the post Taco Tuesday, because I think I know what's for dinner now!

For this first card I inked up a citrus embossing folder to create the background, and stamped colored and fussy cut the Margarita Glass, adding some glitter glue to the rim for the salt.  I heat embossed the Citrus Slice and attached everything along with the Toes in the Sand Birthday Greeting.


Here is another graduation card I made, because, tis the season!  I copied the layout from my last graduation card here, I just changed up the school colors and added the bee, since that's the school mascot.  


Here are the stamps I used:
Graduation is The Beginning Verse

Here's hoping your summer is in full swing!  Thanks for stopping by!
Karin


Related Posts with Thumbnails